
A cool evening, some wine, your best girl or guy by your side, and a crackling fire to warm your tootsies. Romance, that’s the one thing I think of when I think of a fire pit. Oh, and burning stuff. Romance and burning stuff, the two things I think of when I think of fire pits.
Like most things in life, a fire pit can be as complicated or as simple as you want it to be. It depends on your DIY abilities, your budget, and your laziness.
THIS is what most people want.

That, my friends, Is the most awesome fire pit I’ve ever seen. It’s the $2,580.00 72-in Iron Oxide Patina Steel Wood-Burning Fire Pit (Lowe’s Item #: 597308). Yes, SIX FEET of beauty to burn stuff in. Yes, almost $3,000. Yes, I’ll come back to reality.
Most people just need a little place to sit back, maybe watch a little Mork and Mindy on channel 57. Maybe kick back a cool Coors 16-ouncer. And they don’t want to spend $3,000, they want to spend maybe $200.
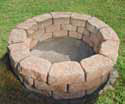
Enter the allen + roth Ashland Flagstone Fire Pit Patio Block Project Kit. (Lowe’s Item #: 477106).

The kit includes:
- 36 Flagstone Wall Blocks (there are probably extras in there too but you don’t need them all)
- 7 Gauge Heavy-Duty Steel Insert
Extra materials needed:
- Tamper
- Household Level
- 3 Bags of Gravel Rock
- 2 Bags of Leveling Sand
- 2 Tubes of Concrete Adhesive
- Caulk Gun
- Shovel
- Optional Marking Paint or Chalk
The allen + roth instructions are as follows:
Step 1
 If you’re putting the pit in your lawn, mark a 49” diameter circle then go to step 2. For a patio, use chalk instead of paint then skip to step 5.
Step 2
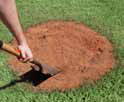 Remove all sod, roots and dirt to a depth of 2 inches inside the circle.
Step 3
 Level the soil and remove high spots as best possible. Tip: Use a household level to help.
Step 4
 Add 1.5”-2” of paver base and level. Moisten with water to aid compaction then use a tamper to pack the entire area firm. Add .5”-1” more of paver base and level again.
Step 5
 Place wall stones on top of paver base, firmly touching each stone creating a circle. Make sure each stone is leveled front to back and side to side and even with adjacent stones.
Step 6
 For the second layer of stone, lay the middle of each stone over the joint made between the sides of the two stones underneath it. Place stones firmly together and level as before
Step 7
 Attach the two layers of stone together using concrete adhesive. Remove one top stone and lay 2 liberal beads of adhesive near the center of the stone. Place stone back and press down firmly. Repeat for all 2nd layer stones.
Step 8
 Lay the third layer the same way you laid the second. The third layer joints should line up with the first layer joints. Adhere the stones with concrete adhesive as you did in step 7.
Step 9
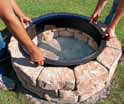 After all stones are set, install the fire pit insert. The insert’s top lip should rest on the inside edge of the fire pit stones.
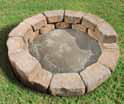
Step 10
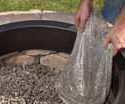 After the adhesive cures, pour gravel rock into the bottom of the fire pit, leveling it as you go. The gravel should reach the bottom of the insert ring.
That’s it.
The whole operation shouldn’t take more than an hour.
Of course in my back yard I haven’t quite figured out what I want to build. For now I’m just cutting the trees that fall over in my yard into chunks, making a fire circle out of them, and throwing them in the fire when they dry out and start to burn. Then I just replace the missing part of the ring with a new log. Easy.

Click here to go to Lowes.com for more information, fire pit ideas, and how-to videos.

Sign up for the free Lowe’s Creative Ideas Magazine, which is filled with ideas + inspiration! Plus you can always follow them on Pinterest and Instagram for even more great ideas!
Disclaimer
“In accordance with the FTC Guidelines, I am disclosing that I received compensation from Lowe’s for my time and participation in the Lowe’s Creative Ideas Influencer Network. Although we have a material connection to Lowe’s, any publicly stated opinions of Lowe’s and their products remain our own.”


