If you just want some DIY cat tower plans, download them now. Otherwise, begin to read. You’ll need to read anyway.
A few months back, the family was in the pet store, and we came upon those things.
Things for cats to climb on, sleep, scratch…cough up hairballs.
My Daughter: “Dad can we get one of these things for the cats?”
My Oldest Son: “What do you call them?”
Me: “I call them expensive.”
Like $150 and up expensive.
And there’s no way I’m spending that much on a cat, just so it can look down on me with its conceited little smirk.
Make no bones about it. I don’t like cats. I’m allergic to them. Yet I have two.
But I found it in my heart to build them this DIY cat tower / cat tree / scratching post / kitty tower / cat furniture / cat gym / whatever-you-call-it-thing.
Because they deserve the best.As long as the best is under $25.
My trip to the pet store revealed these cat towers are “masterfully” constructed with cardboard concrete forms, two-by-fours, PVC pipe, sisal rope and carpet remnants.
I knew I had most of that stuff laying around, taking up precious shop space at the house.
And if I built my own DIY cat tower, I’d win on many fronts:
Save $125
Brownie points with the wife and kids
A post for Dadand.com
Use extra stuff lying around/clean up shop
Cats stop scratching on other stuff
Cats sleep farther away from me
So you can build a DIY Cat Tower / Cat Tree / Kitty Tower / Cat Furniture / Cat Gym / Cat Condo too.
I started by referencing a photo I took of the $$$ Cat Tree at the pet store. Then made a quick sketch of what I could do with the materials I had.
These things are nothing but particle board, cardboard, some PVC pipe and cheap, ugly carpet. I didn’t want to spend money on a concrete form (the curved platforms), so I just made them flat.
Here’s a checklist of stuff you’ll need for your DIY cat tower. Source locally first (like in your garage), then go to the home center for the rest:
I started by laying out some lines on the piece of 1/2” MDF I had. You can use plywood or particle board. I just had this already and wasn’t going to use it for anything else, anytime soon.
Refer to the downloadable cat tower plans for a cut guide.
Although I don’t actually cut on the lines, I just lay it out to help visualize and make sure I can get all the pieces I need from the sheet. And marking where the 2’x4’ uprights will go helps to get everything assembled. Plus it makes for a nice photo for you folks.
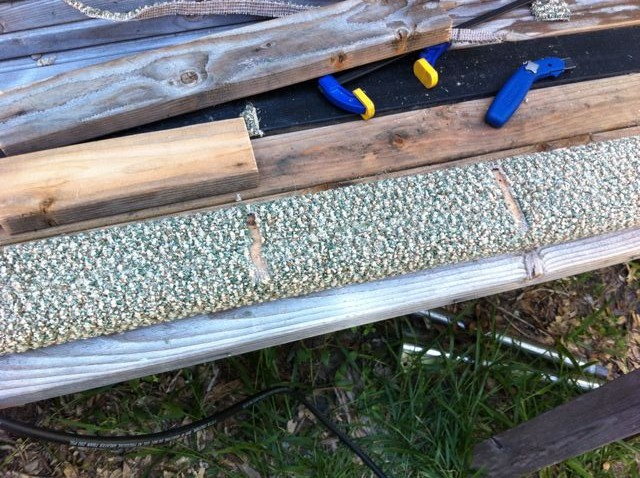
This is the carpet I bought from Home Depot. It was roughly $5 per square yard and 12 ft. long. So 1 yard by 12 ft. was plenty to cover the entire cat tree, and I had enough left over for a little doormat to my shop.
I won’t go over how to cut wood, but I used my table saw to cut all three levels and then a circular saw to cut the 2”x4”s to length. Here’s all the stuff piled up outside on my makeshift workbench.
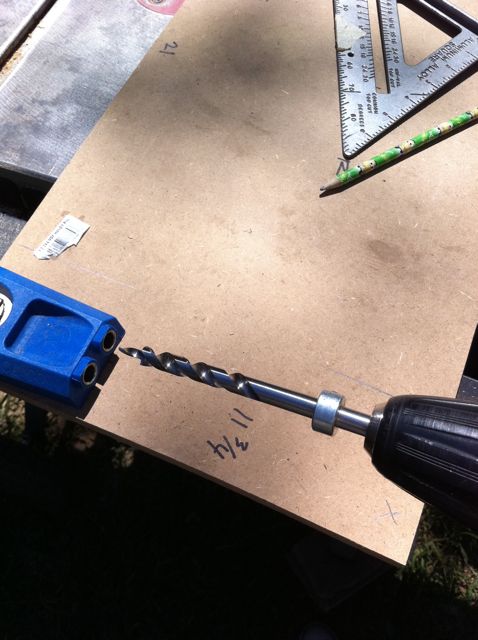
I’m also going to skip the simple stuff like how to fasten the 2”x4” upright to the base. Just make sure it’s plumb and use some screws from the base into the upright. As for attaching the first and second floors, I used pocket holes. Pocket holes allow you to essentially put a screw, at an angle of about 15 degrees, from one workpiece into another. Kinda like a screw on the same horizontal plane as the workpiece. This let me fasten the first and second floors directly into the uprights without the use of a cleat, or fastening from the upright, into the floor surface.
Here’s my Kreg Pocket Hole Jig. It is clamped where you want to create a pocket hole…
…then drill through the jig using the Kreg pocket hole drill bit. The tip is formed to create a pilot hole for the screw, and countersink the screw at the same time.
Here’s two pocket holes. The screw will fit entirely within the hole, so the screw head will not protrude above the plane of the workpiece.
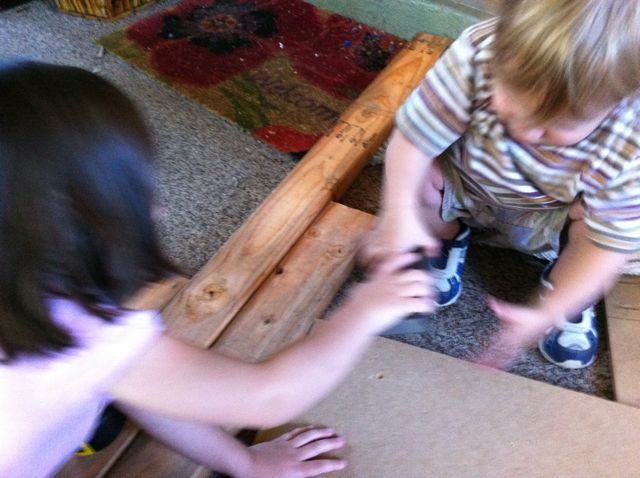
I got the twins, and my youngest involved with sanding some of the pre-drilled holes for the uprights. The MDF tends to bulge a bit on the opposite side of your pre-drilled, countersunk hole.
Fighting over who’s going to sand.
Sanding away.
I marked the uprights so I’d have some reference to fasten each level of the cat tower. Then, I assembled it in its entirety to check for fit prior to upholstery. What gets tricky is every piece gets ½” larger after upholstering. The carpet is about ¼” thick. I made up for that by cutting my boards a bit smaller (cut list is accurate), and trimming away some carpet in some locations on the uprights. You’ll see where in the next few steps.
Let’s wrap the uprights. I butt the end of one upright to the selvedge on the carpet and got ready to staple using my Craftsman Pneumatic 1/2” Crown Stapler. You can bust out the Arrow T-50 if you don’t have an air stapler.
I stapled one edge all the way down, then rolled the carpet around the upright and stapled along the other edge. Using a long metal straightedge, I trimmed the carpet along the center to make a nice straight seam. This shot shows the two areas I trimmed away to allow for the first and second floors to fit nicely once they are upholstered.
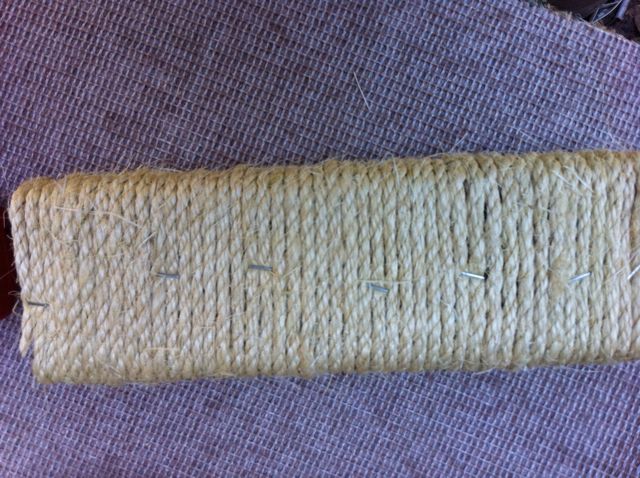
Here’s the upright for the first floor. I wanted to wrap this in sisal rope so the rats…err…cats have a place to scratch. Or simu-scratch since they’ve been declawed.
Wrap the rope around the upright and place a staple on the backside every 10 courses or so. Use a fairly long staple here, so it can get good bite in the wood, and be less likely to pull out later. I figured the cats would come at this thing from the front anyway, so their little paws won’t get hurt if I kept the staples on the back.
Here’s a shot of the second floor. You can see my markings and holes for fastening to the medium-height upright, and the pocket holes into the tall upright. You need to wrap this thing with carpet, so cut a piece that allows about 2”-3” overlap on all sides.
I fold over one side, and staple from the middle out to about 2” from each corner. DON’T staple all the way to the corner, cause you’ll need to fold the corners up at the end.
Here’s three sides done. See the corners? I do those last. And right now I am wondering how I will commit that process to text on a page.
Here’s how. Just show a finished shot. Nah. Move onto the next shot and you can see corners.
My normal approach to wrapping a corner is seen on the left. But with thick, rigid carpet I take the approach on the right. It’s okay to seam the corner since the carpet pile will hide the seam if you do it right. In the first frame I drew some guides to show how I plan to cut. I follow the topside edge of the board out ¾” of an inch, which will allow for a seam on the corner of the sides of the board. The cut coming across the diagram makes for nice 45-degree flaps to staple on the back.
Here’s the back of the second floor, go ahead and cut out the carpet areas to allow for mounting on the upright.
With everything upholstered, I’ve moved onto the messy porch to finish assembly. Frank is there to help me. Since we had already assembled the cat condo once, this was a breeze. And for the second and third floors. I just shot the screws right through the carpeting, into the uprights (from the top down into the upright).
So that’s it. Done. As soon as I put it in the house, one of the cats had to try it out.
I ended up turning the tree around, so it would be easier to access the third floor, and threw one of their beds up top—to entice them to get away from me and our tail-pulling two-year-old.
Try and make your own DIY cat tower. Send us some pics or something. Just don’t send me any more cats.
Very nice cat condo! We are in the same boat (well, no allergies) and fell in love with an actual “Cat tree” kitty condo online at [website]. Since they were so darn expensive, we decided to build out own. It turned out great! Other than the 4 weekends of work it took to put into it!
This looks great and I’m about to attempt it, but I have a couple questions.
1) If I don’t want to buy a pocket jig (I’ll probably never use it again), what’s the best way to attach all the platforms – just screw in from the side through the vertical support?
2) How do you screw the platforms into the tops of the 2x4s without the screwheads showing? Unless you didn’t actually staple the carpet to the platforms until everything was assembled? Hope that makes sense.
If you have good aim you can screw in through the sides. But you could also pre-drill at an angle like a pocket jig but you’d have the screw head protruding under the platforms unless you bust out a countersink bit as well. Marty might have a different idea.
Thanks for the reply, Pete. Making god progress here, with carpet and wood all cut and just about ready for assembly.
One more (maybe stupid) question… In your instructions, you first assembled everything before carpeting, then disassembled, carpeted, and re-assembled. How were you able to find the pre-drilled holes once the carpet was installed over all of the wood?
Hey Bryan,
There’s no science behind finding the pre-drilled holes, I basically referenced an upright or the underside of a board to try and find the holes, or I measured where certain holes were prior to upholstering. You can also poke around with an awl or pick tool to probe through the carpet and find the holes. Because I used a countersink for flat surfaces or pocket holes for other joinery, the holes are quite large and help to guide the screw…I hope that helps. Send us some pics when you get done!!
Oh, I meant to say…how do you know whether I declawed my cats or rescued two declawed cats from the shelter before they were euthanized?
You don’t. But I like my first comment better.
Idiot or not, I had my cat declawed – AFTER trying several, several alternatives: treats/training, spray bottles, hissing, rattles, battery-powered sound makers, boundary spray, even those God-forsaken kitty-claw covers. It’s been 3 years and I couldn’t be happier!
Also, I really, REALLY enjoy your comments :) And this is probably the easiest cat tree I’ve seen which inspires me to make my own if it’s nice this weekend. Thanks, chief.
Even if the cats were declawed after joining Marty’s family, I’ll bet whichever family member took the cats to be declawed loves that person just as much as every other member of the family.
We have two rescued cats. One was declawed before she rescued us and the other one has her claws. Never assume someone declawed their cats. It makes you look stupid.
So tell me… which is better… to de-claw your cats and keep them? Or not to de-claw your cats and end up giving them up to a shelter because you can’t control your cats scratching? My cats are not de-clawed, but if the use of their claws started causing problems I couldn’t solve and made me love them less, It would be better for me to de-claw than to re-home (or risk possible euthanization by giving to a kill-shelter)
2Cats, thanks for your comment. I think Conor is passionate about not declawing a cat, and maybe good at jumping to conclusions. I, on the other hand, just happened to adopt some declawed cats and build them an awesome place to sleep and lick themselves.
Does the type of carpet matter much? I have a huge roll of it from when I moved into my house. I would like to use it to make these as well, because I too feel they are WAY to expensive.
This is AWESOME!! It was my goal to do something like this, but had no idea where to start so I got a rough wooden shelf at Ikea (of course, the cats haven’t figured out its for them…). I want to cover it in carpet and sisal, and knowing the prices/where to get them is very much appreciated! Thank you for posting the instructions, this is really going to help! :)
This is fantastic! Definitely the better choice! I’ve been looking for an inexpensive cat tower but to buy one you either sacrifice your wallet or quality and stability, and with a new very active kitten plus a 14 pound lounger cat you definitely need stability!
We’ll be trying this as soon as we can get all the supplies. (sadly we don’t have much for scraps/extra building materials around our garage)
And of course you’re only limited by your imagination. You don’t have to necessarily follow these plans. You can come up with anything you want. Don’t forget you can probably find el cheapo supplies at a Mr. Seconds or a place like that. Everything is covered with carpet anyway so you can get ugly plywood and nicked up 2x4s for less that top-grade lumber.
This is great! I’ve been looking for a plan I could do easily. I will be adding a concrete tube for them to crawl into. I have the lumber in my garage already. I am going to look around for some carpet, maybe a remnant at the flooring store. Thanks for the plans!
Good idea. You could even do a carpeted tube vertically mounted on a flat base with a hole in the side near the bottom so the cat could climb up through the tube. You know how crazy cats can get.
I have never been on your site before, but took notice when this exact scenario you described above played out last weekend. Child:”MOM! The kitten would luuuuuv that cat tree. Can we buy it?” Me: “Pssht… I can make that. And it will be bigger, better, stronger.” Child: “Oh God mom….. Can’t we just buy things like normal people!?” Actually, no, we can’t. And I’m not spending $150 on something made of materials I regularly keep in my garage. She probably won’t help me, but I’m doing it, and thanks for the great plans! :) I will be trying this out this next weekend and I’ll send in some pics!
AWESOME! Take some pics for sure and we’ll put them on Facebook. Of course there are lots of options to make cat stuff. The other day I saw an el cheapo night stand type of thing that someone carpeted the inside of the bottom shelf and put a PVC pipe wrapped in rope between the bottom shelf and the underside of the top. Then it still makes for a usable surface possibly. Especially if there’s a drawer. And go like us on Facebook. :)
I recently adopted two cats and thought I’d be the ultimate cat mom by buying a 5ft cat tree from the store. Oh they’ll have fun and play and share… Not quite! It’s more like 2 cats enter 1 cat leaves. I can’t afford another tree and found your website. It’s great! As it happens we’re gutting an apartment and will have lots of spare stuff. In fact, we have 3 floors length of concrete board tubing (don’t know the technical name). I could make the equivalent of a hamster run. The cats would probably just stare at it so I’ll stick with your tree for now. I’ll reality check my ambition and take pictures.
Sounds awesome. Every cat I’ve ever owned is just as happy with a cardboard box as it is with a huge climbing thing but they are crazy animals and we need to obey them and bow to their wishes.
Marty thanks, very detailed and clear plans to follow.
I have a large cat about 13lbs, I’m worried about the stability of the tower if my cat decides to jump on the 3rd(highest)step.
Also, can you recommend any way to reinforce the cat tower to prevent tipping.
Please comment, I’m very concern about this issue. much appreciated.
Hmmm, the good news is if you have a 13lb cat and they can jump to the 3rd step then you have the most athletic 13lb cat in the world and they should be in the cat olympics. You could always just make the base larger than specified or put it up near a wall and screw an L bracket into the wall and anchor it to the underside of the top tier.
An another note, if the cat does jump up there and knock it over they’ll probably learn their lesson and not do it again.
Yay! This is awesome. My kitten will love being up high, my cranky old cat will love being away from the kitten, and I will love saving a ridiculous amount of money.
I’m thinking you could use PVC pipe for a lot of the structure and just spray mount the rope in place… any thoughts on that? I haven’t quite thought it all the way through… but I have an inkling it’ll work…
As long as you can secure the platforms to the columns then any combo of scratching things and platformy things will be awesome for your cat. You don’t want you cat taking a huge nosedive if your tower tips.
Meh, he’d love that part…Wheeee!
I volunteer at the local shelter and they have these sorta cat shelves in the cat rooms made entirely out of PVC and nylon webbing. The cats seem to love them (as much as you can love anything living in a shelter with 8 or 10 other cats). But anyway, I may blend the two ideas and see what I come up with. I’ll send pics if I succeed…
Very cool! Just stumbled on your blog while looking for DIY cat trees. It’s nice to get an idea of the supplies needed to get this project going. Will definitely be looking at what other projects you have.
I saw your post, your break down of instructions, and the end product and it motivated me to build one of my own. I was in the same boat as you because my wife wanted one but there was no way I was going to spend $200.00. I did some slight modifications to your layout but followed your blueprints for the most part. In the end a 75% savings and a nice afternoon with my oldest son. Love the site! I have some pictures but don’t know what email to send them too. Let me know if you would like them. Thanks again!
You guys cracked me up reading this post. You are so getting dad of the year:-) Oh and the plans are great too. I’ve been collecting supplies to make a cat tree for at least a year… I have the carpet, scrap wood, sissel rope and even a kreg jig. I just couldn’t decide how to put it all together so I am going to try and tackle this project today. Thanks for the great plans
I used your plans to make a cat tree for my cat. Total cost to me $21 for carpet remnant and rope, as I used some on the upper level too. Cat loves it. Thanks for the great instructions.
Hey guys. I was thinking that if you did want to add a curved platform or a tunnel-like level, you could use a cardboard building tube from a hardware store. I don’t know how much they cost, but they still have to be much cheaper than buying a pet-store tree. There’s a great tutorial here http://www.moderncat.net/2011/08/11/diy-kitty-condo-from-lowes-creative-ideas/
Another possibility would be to use a solid, plastic planter or pot and cover it with carpet or another durable fabric.
That’s what they really use in those expensive cat towers (I think). I’ll get Marty working on another cat tower made of tubes. Marty, get to work on the tube technology.
Gents, This is as good as it gets. Today, I was on a conference call and started googling pics of cat towers.. thinking maybe there is an inspiration. I could not bring myself to buy a tower for $100 or more…because I wanted a big awesome tower for jack and emmie, our two cats. Within seconds of seeing the blog entry, pics and text, I ran into the basement and got started..without hanging up (on mute of course). It all fell together, including disassembling and re-using the existing scratching post. 30 min later after the call ended, I discovered the plans… and that was it. What a creative masterpiece. I just fricking love it. Well done!!!!. tomorrow I wil cover it with carpet but I am thinking about reusing some pieces I already have … even if they do not match well. That cats don’t care!!! thanks for the inspiration and what a great site. Best to you both.
Hey-Just wanted to thank you for the easy to follow instructions! It inspired me to make my own (we only had wood for two levels) and it really was easy to assemble. Saved us a ton of money and had fun building it. We put the first one in of our boarding rooms and will make another for our cats someday soon. http://www.campwhiskers.com/blog
My wife and I decided to remodel our basement this summer and had a bunch of leftover materials that was just lying around. My wife stumbled upon your site the other day and didn’t leave me alone until it was built! You gave us a great plan to work from and our two cats love it! Just wanted to thank you for giving us kitty bliss!
Thanks again!
Roxie & Katniss!
I am in the process of building a 5 level cat tree with a house on top. So far it hasn’t cost me a dime. I am using scrap wood from a construction site, carpet that I got free from my neighbor who installs carpet, spray glue glad I found in a house I rented, and screws and staples that I already had laying around. I will post some pics when I am done, but I decided to take a break to superglue my fingers back together. If anybody is wondering, peroxide is great for removing blood from carpet. Be careful people, razor blades are sharp.
If it’s FREE, it’s me. And, yeah, I had a run-in with a razor blade last week. http://instagram.com/p/SEJkRTpAYy/ Get us some pics somehow when you’re done. Maybe on FB.
wow, that looks fantastic marty!!!!… do you mind giving me the lengths you used for your 2×4’s??? I didn’t see those on your pictures anywhere. I’d love to copy this design for my cats since our old 10 year old one is falling apart. I think I can see all the dimensions of the mdf (the bottom was the only one I can’t really see but it looks like it’s 24×14)
Marty’s going to try and get some measurements up but I’d say it’s not an exact science. Make the 2×4 verticals however long you want and as long as it works out so you have the levels lining up you should be fine. I’d bet his are like 1 1/2′, 2 1/2′, and 4′. We’ll see what he chimes in with.
Mike, I’m not sure how I omitted the lengths of the upright 2x4s, but I can assure you Pete’s sense of proportion is pretty much right on. Here they are from short post to long post: 11.25″, 23.25″, 47.25″. You can see I was trying to get it to even out to round number heights accounting for the thickness of the MDF (.75″). And you were close with the bottom panel, it’s 24″x18″. Sorry for the delay, my tape measures seem to have grown legs. Legs that are about 18.5″ long to be exact.
Thank you for the tutorial, I used some scrap wood and 2 x 4 to build mine. I used remnant carpet and also bought a few yards at my local Home Depot. I drove in a support beam crooked; but the cats don’t care as the tower is sturdy. Thanks again!
Thank you for the awesome blog post! I had a great time building the cat tree with my dad. (I mostly watched). It was a great way to do some father/daughter bonding while saving a lot of money. The hardest part was wrapping the wooden flat pieces with carpet. We used a very thick carpet, so the corners didn’t come out as nice as I wanted to.
The first version of the cat tree looks similar to yours. But it turns out that even though my cat was capable of climbing to the third level, he was too lazy to make the effort. So we added another level between the second and third level to make it easier.
Love the cat tree. I have a kitten that I rescued that had to have a leg removed so I have been locking for something smaller. Your tips on screwing together will help. The person was upset about your cats being declawed because of the agony the cat goes through. As a rescuer and animal welfare activist I have to say they went about that all wrong. The idea is to educate, not insult people. So sorry someone had to be so rude! Thanks for posting this! I will share with my rescue friends.
Tracee, thanks for checking us out. Share a photo with us once you get one put together, and thanks for spreading the word. As for the comment about the declawing, the problem was that the commenter assumed that I had the cats declawed. We rescued two cats that were already declawed. I clearly state I’m not fond of cats, I’m allergic to them, but deal with it cause my wife and kids wanted some cats. The important thing is that my children experience (and learn) the commitment and responsibility that comes with adopting a pet. We wanted to show them that there are many animals that need a loving home, and that you don’t always have to go to a store to buy “new”…whether it’s a cat tree or a pet.
Yes, that was very rude of them. I am not a big cat lover but the little guy kinda grew us. He was only 4 weeks and so tiny and so sick. I am more of a dog person myself. I made my tree smaller as he is only 5 months and has the 3 legs. When he is more stable I will add on to it. I don’t wan’t him falling! I will grab a good pic today and post it.
Thank you for the awesome tutorial! I followed your directions and made a decent tree this afternoon. I didn’t have any scraps laying around (we’ve been doing a major clean up, and all that stuff went to the dump), but I do work at Home Depot. A few words of advice for anybody who needs to buy the lumber: The Home Depot will cut it for you as long as you have the dimensions you want. Since I work there I cut my own, but the Lumber associates cut stuff for customers all the time. Oh, yeah, I uploaded a few photos of the finished product: http://s222.beta.photobucket.com/user/vectornut/library/Miscellaneous%20Debris/Pictures%20for%20Forum%20Posts/Homemade%20Cat%20Tree?src=pb
I recently obtained an interesting shelf I wanted to turn into a cat tree. I have done this before with an old TV stand. However, I am looking for input on this one because it is a 6 foot tall, 4 shelf, straight up and down shelf. Just looking for some input and ideas from someone who has built a cat tree from scratch. Thanks!
Sounds awesome! I’d probably making it like a whole cat condo for real. Cut openings in each shelf so they can climb internally up to the top. Maybe alternate sides, left, right, left, you get the idea. I’d probably carpet all inside surfaces (except maybe the ceiling of each level), maybe one wall could be some other texture you could swap out. You could get crazy and maybe enclose part of the bottom shelf and out their litter box in there for privacy. Maybe one of the levels could be the kitchen and have space for their bowls of food and water. One leve could be the play room and have junk dangling from the “ceiling”. It could be awesome.
Well, it’s a little small that much LOL. But when I saw it I instantly thought cat tree. My first step will be carpeting the shelves. I am thinking the first two shelves they can easily reach, so not cutting anything on those. The last two shelves are where I really need some input. I am not sure how big an opening would need to be for them to easily just crawl up from one shelf to the next, without losing space for them to lay down. Or if maybe a ramp system to the third shelf would be prudent.
I can send you pics for some ideas if you would like. I can send you a pic of what I did with an old entertainment stand as well. It was nothing complicated, just $30 in rope and some old carpet. But when people see it they think its something I bought from a Pet Store.
Yes. Our cats would love a 5 gal bucket. Also, paper bags. And boxes…shoe boxes. But yes, I see what you’re getting at. Maybe integrating a 5 gal bucket into a cat tree, carpet the inside/outside of it, cut a hole in the lid and BAM. Instant cat attraction device.
You can really do anything you want as far as measurements but here they are from short post to long post: 11.25″, 23.25″, 47.25″. You can see he was trying to get it to even out to round number heights accounting for the thickness of the MDF (.75″).
Thanks for the quick response, I am good with the height of the vertical posts, but I was talking about the measurements of them in relation to the ground floor. It looks like they are 1.5″ away from the edge?
Yeah I think that’s about right. I’m not sure that was even really measured. I think that was just eyeballed and adjusted during build to accomodate the footprint of the other platforms.
Thanks for the cat tree plans! My partner and I found your plans this morning and made a cat tree today! In wrapping the 2 x 4s used WAY more than 50 ft of rope. Cat loves it so far – but that could have something to do with the catnip. We still hope it will be a good alternative to our much more expensive couches. Loved the PDF plans.
This looks awesome! Thanks for posting! About how much rope was used to wrap the single upright? I’m thinking of doing 4x4s so I’m trying to figure out how much rope I need for two 4′ (4’x4″x4″) and two 6′ (6’x4″x4″) uprights.
Hi guys!
so I am looking to build a new cat tree for my cat as she needs a new one every six months and I want something more durable then the 40$ ones i get her at walmart. the only thing is that I move alot so I need to be able to take it down as much as possible. the ones that I get for here have a headless lag bolt that screws into the top of each pole halfway then the perch boards go on then the bottome of the next pole screws into whats left of the lag bolt. I want to figure out how to do this with a 2×2 piece of wood shoved down the center of pvc pipes…..how do I do this?
any help would be greatly appriciated
Barb, you could probably use a dowel screw, which is essentially what you described as a “headless lag.” It’s just like a lag bolt but threaded appropriately on both sides. Other options could be a stair rail bolt, which is machine threaded on one side and has a side like a lag bolt. That involves a little more work to use.
Do a search of “dowel screw” and “stair rail bolt” to see what they look like and examples of use.
I suppose you could use a 2×2 with a dowel screw on one end and assemble just as you had described. I would think that the coarse threads in the wood may only be good for a few teardowns before they wouldn’t hold very well anymore. If you want to reuse the 2x2s indefinitely, with repetitive assembly and disassembly, then you should consider using the stair rail bolt and disassemble from the machine thread side.
Another option is to use a length of all thread (a bolt that is headless, and has machine threads the entire length) with a threaded insert.
Just found this page via google. Awesome plans you have here and I’m going to build one this weekend. I’m definitely favoriting this page and coming back for more!
I live in an apartment and so I dont have a garage or any of the bigger tools/less common tools due to lack of space. Any suggestions on how I can make a big tower without having to spend a lot of money on tools? For example can I use a hammer and some small nails instead of the stapler? I dont know much about building anything but I am interested in learning.
I’m sure you know from experience that cats will sit on anything, especially if they can sit up high and look over their domain. I think you could build almost anything and it would work. Sketch it up on paper, have fun. You could probably nail carpet to the flat surfaces with upholstery tacks or something. For rope you could always tie it off at the top of the vertical posts where you want rope, wrap it all around, then try and tie it off at the bottom. Then just sprinkle some catnip on it and the cat will be all over it.
I’ve gotta say, for my first time doing a project like this, you guys made it super easy. It turned out great and most importantly my cat loves it. I’ll admit, its not as polished or nicely made as yours, but it stands and gets the job done :) Thanks for the post. It saved me at least $100 and I just picked up a new skill.
Hi, I want to try to make this tree but I don’t really understand from your instructions how to make the beams the tall pieces which hold the platforms together. What are they made out of and what are the measurements thanks.
James, the beams are just 2x4s. Download the plans and it explains materials and has a cut list. Thanks for checking us out. Feel free to post your creation to our facebook page!
Moved in with my guy 5 months ago…. he has dogs, I have cats. My kitties are staying with a friend while we figure out a way to keep both sets of pets happy. I think this is a good place to start. We have a very high vaulted ceiling so I am planning on a bigger version… wish me luck!
looking forward to building this for my cat, my husband wants to kill him half the time for jumping up on certain pieces of furniture he shouldn’t be, but hey he’s a cat, its just what they do.
I am by no means good with tools, give me something from Ikea and I’ll still screw it up somehow, but for some reason the step by step guide with pictures makes me think that I’m going to pull this off. Just wanted to say THANKS ahead of time for posting this, also a little luck might help but hey as long as i don’t lose a finger its a win win for me and Butters (the cat)
Are you talking about Micro Data Format, Mule Deer Foundation, Main Defense Forces, Maryland Death Fest, or Medium Density Fiberboard? In any case, YES.
The comments are almost as great as the info you guys put out there! I might have to make a FB page just to “like” this site. My Dogs Farts ARE dangerous!!
Thanks a lot for this post. It was very helpful in building one myself. We just got two kittens for the kids decided I was not spending $100+ on something I can make from the scraps in my basement. The only thing I really needed to buy was the sisal rope. Great post, thanks again!
Thanks so much for the great and easy to follow plans. Just finished my cat tower tonight and in the end it cost me about $20 to make with stuff I had already kicking around. While it’s not perfect, the cats love it!
Amanda,
Sure, you could drive screws through the upright post into each “shelf” but you’d have to use a 3″ screw. Another option would be to use some corner brace brackets, which would probably be the easiest to apply and would support each “shelf” with no problem: http://www.lowes.com/ProductDisplay?partNumber=66938-1277-MP121BC
Thanks for checking us out, share some pics on our Facebook wall when you’re done!
I had the day off of work, and this is what I did. The only thing I did different was to add an ‘L’ bracket to the top level. One of our cats is part Maine Coon, and he is huge! It turned out great, and the cats love it. It cost me $37, but I bought a box of wood screws that I didn’t need after all. Thanks for the plans!
Great instructions! I have a tidbit to add – if you can find a cool cedar tree, you can remove the bark and sticky cambium layer with a pressure washer easily, and then you have a beautiful tree to start your project. Making 2 for my grown kids for their Christmas presents.
Hey Thanks a lot for the idea. I adopted a abandoned cat a few years ago and he has become my best buddy…. (even after I de-clawed his front paws to save the leather in my house). I did make some altercations to this by cutting out notches in the 2×4’s to have the floors sit into them and then screwed the 2×4 into the floors thus doing away with the need of buying a jig. It also gave strength and extra weight bearing to the structure. I had so much fun making this that I made 4 of them and am now designing and building an even bigger and more complex one.
These DIY cat condos/trees look great! I am currently building a kitty enclosure for the backyard that I am planning to have something like this inside for them. It won’t be totally out in the open against the weather since it will have a roof, but the sides of the enclosure that aren’t against the house will be made of Phifer Pet Screen. That being said, are there different materials choices that you would recommend for a somewhat outdoor condo? I don’t really want carpeting that may mold if wet from rain, for example, but I don’t want to just use treated wood either…seems kinda boring for the cats. Any suggestions you might have?
Well, I finally built it today. It was actually even easier to build than I thought it would be, and so much more durable than the ones you can buy at the pet stores! I think I will be making another one for inside the house, too. It will definitely save my ottoman from being used as a scratching post. Thanks so much for the plans!!!
Here are a couple pictures of it with one of my cats checking it out in the first pic. I haven’t even moved it to its permanent location; it’s still sitting in the middle of my kitchen.
I had a little trouble with the carpet since I had never done it before, but I think it turned out nice. I’ll definitely have to make a second one for inside the house since my inside cat obviously likes it.
You use 1/2″ MDF on the blog post, but your instructions recommend 3/4″ sheetgoods. So, how is the half inch holding up, and would you recommend against using it?
$20 in carpet and $10 for the sisal rope. All the rest I had as scrap materials. I put the rope on the 2nd floor support and only went 3′ high with the 3rd floor. Cats love it. Thanks for the plans.
Thank you for this tutorial! It is very helpful, especially with how expensive good cat towers are. I was wondering if you knew of any other designs around the internet for entire maybe a more expansive tower for more cats, or anything else. Thanks for this post!
I found your site on Google and I cannot thank you enough for putting this up! I had planned on just building the cat shelves and buying a couple trees, but this just saved me a couple hundred bucks and it looks like fun. I have 3 cats at home and 2 of them have more energy than they know what to do with. I can’t wait to try this out, thanks a ton!
Hi I just found this sight after I was at the Petco near where I work.I’m adopting an 11th month old kitten from the shelter that works with the store.But looking at cat towers,they looked like something I could build at home for a bit less and make way nicer.So thats what I decided to do.I’m sure she’ll love the tower once its finished,thank you!
Yep, helpful, but don’t like ‘hating cats’, especially your own, even with allergies. Not their fault, and it is enough to mention not liking them once. Hope the tail pulling stops too!
Googled cat tower plans last Friday, came across this, stopped by Home Depot on my way home and slapped this together in a few hours on Saturday. Thanks for the plans! Even our fat cat can make it to the top and she loves hanging out up there. And this gave me an excuse to buy a staple gun finally… Thanks again, will add y’all on Facebook! Only edit I would make is to purchase 3″ screws if you don’t want to invest in the pocket hole jig
Our high school woodshop teacher used your plans and had some of the kids make one of these for the local animal shelter. It’s great! I am stashing it at my house for now as there is a new animal shelter being built here and we want nice new stuff to go into it when it’s done in the fall. My three former shelter kitties got to check the tower out before I put it under wraps, and they pronounced it “purrfect”! Thanks!!
Thanks so much for the great ideas! i spent a good 45 minutes in the plumbing section of Lowes today piecing together different ideas that were zipping around my mind. I had a small audience before I was done…lol! Now I know what I’m going to do…for the most part. Using mostly your plans (and adding some of my ideas), should make a cat tree that’s the total BOMB! I’ll send pics when I’m done. Oh…and for the mental midget who was posting about your cats being declawed…really dude? I guess I must have researched the wrong thing…I was under the impression this post was about helping folks make something good for their cats. Silly me!!
Thanks for checking us out! Feel free to post some pics on our FB page (icon on the very top right of this page), I look forward to seeing your cat creation.
1 questions:
1) What do you think the weight limit would be on the top platform?
My cats not fat, but I don’t want the cat up there and have it break, and she never uses it again.
The more centered you make the platform on the top post the less you have to worry about weight. But with a couple of screws down into the top post I’d think it would handle even the heaviest of cats even if it was cantilevered a lot.
Habitat for Humanity restores are a great place to buy large pieces of carpet from $1-$10 per roll. I think I would have to get a bookcase from there, probably $10, and cut sections out. Luckily, I do have a furniture friendly large staple gun to apply the carpet.
This is awesome. Someone may already have stated this, but faux fur is a good idea because cat claws won’t get caught in it like carpet and it does not teach your cats its okay to claw carpet.
Uh, yeah… This plan f-ing sucks. First, screws don’t work going through damn carpet. Second, 2 inches isn’t long enough for the wood AND carpet. You would need 3 or 4 inch NAILS. Third, the whole thing turned out wobbly either way. Its a piece of crap and I followed every single direction in your plan. Good job
I’ve built 3 cat trees using these plans, and my cats love them. Two of them are used as fun ladders for the cats in their “catio” which is connected to my screen porch through a tunnel. They withstand the beating my 6 cats give them. The third tree was a gift for a friend who liked mine so much she asked me to build her one for her cat. Thanks so much for these awesome plans! And my husband thanks you since we didn’t have to spend tons of money on store bought cat trees. I love diy projects anyway. ;)
I wonder if this guy feels stupid kmnow knowing that in all the comments posted, he’s the only one whose didn’t come out perfect. Sometimes it’s the not the tool being used, but the tool using the tool.
Quick follow-up on my post from 07/11…I found this cool stool at Goodwill. It’s about 5′ tall, with the seat being 4′. I’ve started turning it into a cat stool. I’m not done yet…all I’ve done is wrapped rope around the legs and filled in the top with strips of fabric and hung a few toys on it. I’m busy packing for a move right now – but it has made a great place for the 2 cats to sit in the door and watch the world go by. Had I not found your page, I don’t think I would have even started this. I still have plans for making a tower using your plans as well. I’ll post pics of both on your FB page.
Thanks so much for this — we’ve gone crazy trying to find suitable cat trees over the years (well, having cats will drive you crazy so perhaps it wasn’t the search for the trees themselves…). Anyway, we (old people) are about to attempt to make two or three of these.
Here’s my question: I want to make the floors with ledges around them (not circular — not up to that — but the tree to the far right of your first image seems to show what I mean) and I do believe I can construct them properly (probably use pocket holes). Carpeting the whole thing, however, seems daunting. I was thinking of making the sides of each floor out of 1×4. Do you think it would be better to carpet each and every side and the base and assemble them all together or is there any reasonable way to carpet the whole shebang by doing cuts as you do when you carpet the base? I’m having a hard time imagining the kind of cutting and folding that would require, but taking the time to carpet five pieces for each floor might make me crazier than I already am.
Mike, thanks for checking out Dadand. I understand what you want to do. And you’re right, carpeting something like that can be daunting. I would probably carpet a floor in three pieces. I’d assemble the floor with the two long sides, then carpet it as one piece, leaving the ends uncarpeted. Then I would carpet the two remaining sides individually and then assemble them to complete the “tray.” I threw together a quick drawing to explain: http://www.dadand.com/wp-content/uploads/2014/12/carpet-cat-floor.pdf
Yeah, I did think of doing it that way, but after looking around on the web for various ideas I think I’m going to try a slightly different approach.
I think I’m going to put the whole shelf thingee together and then take a piece of carpet and kind of wrap it around the whole thing (the sides), gluing and stapling. Then I’ll cut each corner and kind of fold it down the interior (cutting somewhat similar to what you show in the cutting and folding guide above). Finally I’ll cut a piece the same side as the interior square and paste/glue it in to cover the seams from the other carpet (it will be lumpy, but cats kind of love lumpy, oddly enough).
I *think* that will work — your suggested approach is actually neater/easier except that it has the issue of not being able to use the same size sides (I’m planning on using some 1x4s I have and don’t want to cut other than length).
Then again, I may not have the slightest idea what I’m doing — all of my wood working experience was about a half century ago so it will be interesting (I still have a fairly unused Sears rotary table saw that I’ll have to dig out to do all this stuff :>).
Thanks again for taking the time to do all this explanation for us newbees.
“progressive-natural carpet” was mentioned in the instructions for DIY cat tower. looked at home depot & online and couldn’t find it. any ideas as to where to buy it?
Mark,I basically chose in-stock carpet from the home center, something with a low pile. I tried to find something that really just had the colors I wanted in it so it wouldn’t be too out of place in my living room. It wasn’t the cheapest and certainly not the nicest they had. I think really any carpet with backing would work—it’s a little tougher than the non-backed carpeting they use for speaker boxes and automotive applications. Good luck.
I’m going to get the Kreg Pocket Hole system and in your directions you talk about using 2 inch screws — what size do you recommend I get using the Kreg in the pocket holes?
Mike, I didn’t even use the Kreg screws, I save/ration those for other projects. I think I just used some 2″ coarse thread drywall screws I had laying around—they worked in the pocket hole just fine as long as you don’t “overseat” them.
I got the tree together just fine… and now I need to carpet it. What length staples do you recommend? (I notice you said you used a 1/2 inch stapler so my assumption is the staples are also 1/2 inch long, but I use an electric stapler with variable lengths).
Mike, I honestly can’t remember what size staples I used. I probably used 1/2″. If your electric stapler will shoot 1/2″ staples into the wood you used, then I’m sure that’s fine as long as they aren’t protruding on the top side! You probably used 3/4″ wood so no worry. I used one of my air staplers which shoot anything from 1/8″ to 3/4″ wide-crown staples. Good luck and I really want to see your finished effort!
I honestly feel that making your own cat tree is the best way to go…a lot of cat furniture is so hit and miss, but if you make it yourself, you can make sure that it’s well built and balanced.
I was just reading the comments about declawing a cat whose scratching you can’t control. While you can try the usual sticky tape or orange scented spray, the best solution, in my opinion, is those wonderful nail covers you can buy at any pet store. No more scratching, and kitty gets to keep its fingers and their bones. Oh, you didn’t know declawing includes removing the finger bone up to the first joint? Imagine having that done to you. Also, for those of you unfamiliar with declawing, it can affect a cat psychologically also, and not in a good way. It can turn them mean, or take away all their self-confidence. It is illegal in several states, and I wish it were in every state. It is just wrong. Bless those of you who adopted a declawed cat and are helping them build up their self-confidence again. I have two cats. Neither is declawed. However, I am severly allergic to the bacteria one of them has. She has put me in the ER 3 times and twice I nearly had to have surgery due to the resulting infection from an accidental nail scratch. She goes to the vet for monthly nail trims as it is too risky for me to do myself. There is nothing that would make me declaw a cat, and there is no chance she is going anywhere but here in my home. Both of my cats were high-risk adoptations, but with training, patience and love are now lap cats. Please don’t declaw, it is inhumane.
Lei-Ann, thanks for sharing the info on declawing. As you read, I adopted cats that were declawed already. I’m glad to give them a home with or without claws. But a few commenters here missed that part. I jut want to focus on the cat tower, that’s all.
I just wanted to thank you again for your amazing cat tree plans. I have made 2 of these trees for my cats and 1 tree for my friend’s cat. I have also used these plans and learned to determine how to create plans for other kinds of cat trees that I’ve seen pictured on the internet. I have a “catio” in the backyard (out of necessity for evil cat-hating neighbors…I had to build an outdoor enclosure for my cats to ensure they aren’t taken to the pound or killed! Sad that I had to do that because of evil neighbors who just moved in last year…) and these cat trees are used in the catio daily. Thanks again for the plans. I saved a lot of money using them rather than buying the cheap $150 pet store trees!
Thanks for the kind words, Karen. We’re so glad there are so many other cheapskates out there like us. You sound like a good kitty mommy (if that’s a thing).
I don’t think it matters, but I did want to mention that the thickness for the sheet of wood is listed as 1/2″ on the webpage instructions, and 3/4″ on the printed instructions. I went with the 3/4″, because I didn’t notice the difference until after I already bought it. Again, I doubt that it matters, but I did panic a little when I thought I screwed up before I even started. He I go, wish me luck!
Thank you! We aren’t great woodworkers so it was easier for us to get some L-brackets to hold up the posts and platform. Then we went back and added extra screws to ensure everything was stable. To keep the project cheap, I called a local carpet installer and asked if he had any remnants. He was happy to give me some since he trashes them anyways. In all, it cost us $25 (2×4, screws, rope, and L-brackets) to make.
Pete & Marty- just found your plans over the weekend, and although it took us more than 2 hours (2 days) my wife & I really enjoyed this project! The pocket holes are key compared to brackets! We ended up lowering the 48″ post to 36″ as our cat couldn’t get down easily from the top. Overall, great plans and our cat loves it!
-Drew
.
.
I built this fabulous condo in 2 days, the cat loves it! I would say the math is off a little as 14 + 16.875 + 18 = 48.875, and the wood is only 48″ long so I shortened the 3rd floor by 1 “. Basically I cut the 18 ” and the 14″ piece and what was left was the top floor . The pocket holes worked great and I used some 1 5/8″ deck screws and didn’t bother cutting a way the carpet. I used 2 1/2″ deck screws to attach the 2×4’s drilling pitot holes in the particle board I used.
The PDF of your plans is really slick: (Illustrator I presume?) I just adopted three kittens off the roof of the junior high where I teach English. As a former middling construction dude I think cat condos are kind of awesome in all their iterations, but like you said, they’re cheap crud then marked up 200 percent.
I hope I can do your plans justice. Thanks for the details.
Mr.B- we just built this condo & our cat loves it! One modification we made to the plan was to shorten the top floor by 12″. We found our (very) agile cat couldn’t quite get down to the 3rd floor. Otherwise, it’s bewn awesome! Good luck with your build!
Hi: Pete: read your instructions and since I am already pretty good with tools (despite the fact that I am a woman)I pretty much figured out how to do it on my own, but I wanted to say that I think you are so funny with your answers. When the cat tower business comes to an end, you outta go into stand up comedy.
A friend of mine just moved into a new house and we’d like to get her something to detract her 2 cats from destroying any new furniture they may get. This is going to work perfectly! Thanks!
I am trying to find the same carpet you used on Home Depot but can’t see it. I know it is not important but I really like the look of the one you used. Can you let me know the name of it?
Simon, I can only say it was an indoor/outdoor berber-type carpet with bits of tan and green in it. My local store doesn’t have it anymore as this was a couple years ago when I bought it.
This is awesome! My cat likes anything from cardboard boxes, to cat towers. He doesn’t like toys much unless it’s yarn so the best I can do is make him a cat condo! (:
Mindy, I have made a three of these cat trees, and the first one that I made was using just a hand saw, hammer, and some nails. :) I used the plans to know what sizes to cut the wood and how to put it together. I had to get creative with positioning the wood to properly hammer in some of the nails, but I got it done. That particular tree is still enjoyed by 5 of my cats after 2 years (I’m a married crazy cat lady, lol).
I thought you just built righteous cat towers from household items, but now I understand that your real game is mercilessly adopting declawed cats that would otherwise be killed, even though you are allergic, in an effort to bring joy to your kids, and maybe even a few life lessons in the process.
Another satisfied customer. Your instructions were great. Our tower turned out fantastic. A little longer than 2 hours (I am not an expert DIY guy) but it was satisfying to build it as a family.
For those of us who are constructionally challenged, would you mind going into a tiny bit of detail about the concrete form you were referencing in order to construct the curved platforms, or maybe telling me where I could find some info?
I’ve been looking around online for a couple weeks on a good way to create my own and this is awesome!
Proud to say we are now owners of a new cat tower! We made it a bit taller and added a little house on the first floor and toys dangling under each level. Our cat got on it to play before we were even finished with assembly.
I was googling building a cat tree and came upon this site. I have a question that may have been answered but there’s a lot of comments here. Has anyone had trouble with the carpet fraying, and if so how do you stop it?
I built a heavy duty scratching post and the carpets keep fraying.
Yes, after some time the carpet can fray. I think it depends on the type of carpet. The type I used was a close loop weave, which I think was more likely to fray. But I think it just comes with the territory, so to speak. It took over a year before I saw anything fray. For the scratching post I used sisal rope, try that instead of carpet.
Thanks. Just wondering. I actually put a combo of Sisal rope and carpet on the post itself, then carpeted the base. I think it stopped fraying after it went so far. And I’m used to the “territory” so it didn’t bother me. :) Wanted to make another for a friend though, and looking for ways to improve. Also want to try a tree.
Hi, we made this. It took my daughter and I more than 2 hours, but did it with a jigsaw, power drill and staple gun. We did the sisal rope on the two foot pole because our cats stretc when they scratch. It came out pretty good, next time would use plywood and cut back the carpet as suggested. Thanks
Even moms can do it
Hi Jackie, thanks so much for looking out for us. We love you for that. My (Pete) wife is Emily Fazio, the author of that post. She works for DIY Network/HGTV and we let her use our partial content and there is a link back to our post in STEP 1 but I DO wish it was bigger and deffer. ;) Again, thank you for the heads up.
hey, this was extremely helpful! thanks so much. i think i’m going to ask my husband if we can cut another piece of carpeting to put underneath the 2nd level–in case kitty gets a WILD HAIR–don’t want him catching a claw on a screw head. we’re only doing 2 levels due to floor space being a premium here (higher means wider base for stability i figured) and well, it’s really muggy today and we’re thinkin that ANY cat tree’s better than what the cat currently has (none)! all the hate about declawing and the haters didn’t even ask about if the owner was responsible for it having been done–come on folks, get off yer high horses and think before spewing bile! anyway, GREAT tutorial! definitely going to start following on facebook now. we had everything needed to do this in our garage already so it was nothin but sweat equity! thank the gods for left overs!
Echoing some other folks but this was very helpful. Just finished my build this past weekend. We altered the plans a little bit but the instructions you had made that a very easy thing to do. We’re going back to add a little house on one level but my daughter is very happy – and her cat Spike is even happier. Will get around to posting a picture to your FB page. Thanks.
Hi guys! thank you so much for the instructions on how to build a cat tower!
Now I can ask my son to build one for me…or maybe I will tackle it myself!
About that Jig thing…I see one that is very simple and costs only about 20 bucks. I am looking into building some pull out shelves for my cabinets and I will need one of those…so it will be worth it for me to get one..
By the way..as a teacher, I really appreciate your very clear, concise instructions and as a beginner I REALLY appreciate the PICTURES!
**Update** Not sure why it took so long for me to leave a comment… I built this nearly a year ago with scrap plywood and 2x4s that I had in the basement and carpet that I bought from the local home imrpovement box store. Since I didn’t have to spend any money on lumber, I decided that a new pneumatic stapler and Kreg pocket hole jig was in order. The pneumatic stapler was ideal for attaching the sisal rope and carpet. Great plans, the two cats love it. Our one cat with claws scratches on this instead of the new couch. I don’t think you can teach a cat NOT to scratch – you have to provide a place that is okay for them to do it. I had scraps of 5/8″ OSB left over from the Dadand.com shelving project that I previously did, so that made up the platforms. The cat condo is sturdy enough that my kids sit on it! Thanks again for the great idea, plans, and humor!
A few reviews stated it can be a little wobbly, and when mine arrived, one of the tiny, plastic feet had broken off. I’m thinking about replacing all of them with something more stable and protective of my wood flooring.
We had two rescue cats, got them both together about fourteen years ago, unfortunately died so we ended up adopting my brother in laws, she’s about 4 years old and loves our old scratching post which is how I came to find your site, love the tower, now my nine year old son wants me to make one, only problem is I’m bodgit and scraper with did skills, good thing is I know know what a pocket hole is, which me luck, Yorkshire, England:-)
Love this idea as a starting point. Hubby is a disabled vet, so we don’t have a lot of money. We’ve been brain storming the final plans. E found some remnant carpet in our attic from the previous owners. We have new neighbors who are recarpetting and have us some pieces. At work I got a 10″ wide tube that we will lay flat for a little cubby on the second floor. Had some 4*4 posts, but wasnt sure about using something that big. Looked on Craigslist and found someone 2 miles away getting rid of some plywood and 2*4s for free. Picked up what he had. When I sent a thank you, he said he will have more and some carpet next week. So far all we had to buy was some glue and the rope. The rope was $5 for 100 feet of 1/4″ at Walmart. Going to make a separate cat scratch post with one of the 4*4s.
Tried to leave this message this weekend from my phone.
Hubby and I have been looking at building a cat tree for new kittens we will be getting this summer. We didnt want to spend a lot, since we are on a limited budget.
We have new neighbors who just replaced their carpet, and were kind enough to give us some reminants. We also found some in our attic. Then on Craiglist we found someone who was getting rid of some plywood scraps, and 2x4s. After looking at them the next day, some may not be in good enough condition. But the guy said he should have more this weekend, and he has some carpet pieces also. My dad says he has plywood and 2x4s we can have too.
So at this point all we bought was some glue and sisal rope (which stinks like a garage for some reason). The rope we got at Walmart for $5 for 100 feet of the 1/4″. Can’t wait to see how it will turn out. We augmented the style a little to add a round tube on the second shelf (a hard cardboard tube i got from work)
Hey Man, what a step by step guide on DIY cat trees! As I’m researching online a lot but this is the really helpful one that can guide even a non-professional to easily build one. This guideline should be in my resource list that will help my viewers too. :)
Awesome forum, five years old and still getting comments. There are lots of types of carpet at [business] here in Daly City. What kind is the most durable and pleasing for scratching? Some types have the typical criss cross weave of thick fibers, but some have other complicated weaves. Which one would last the longest?
I am in the process of building a kitty skyscraper this weekend. I think I purchased the same rope you did. I also stopped by the home depot carpet section and picked up some tubes the carpet is rolled on. I think it give a more professional look and I can put a block of wood in where I need to, saves some weight too. I also went to the scrap bin and was able to pick up some nice lumber at 70% off. a few boards were 15′ long and had a twist at 12′ so very usable and they cut the boards down so I could fit them in my car. The cardboard tubes I brought my cordless saw to cut down at my car. the plywood I am going to have them rip it into 2-24″ pieces so I can fit it into my car.
I want to replace the worn-out carpet covering on a cat tower with sisal rope.
This is a 3-tier tower with (3) 4×4 posts (60”, 40”, 18”) for a total length of 118”.
Using 3/8” sisal, how do I calculate the total feet needed to complete my project?
Just got a 8 week old kitten for my lady yesterday. She wanted to buy a cat tower, but seeing I am a carpenter I saw no reason in buying one. This will be by weekend project. Modified a little I’m sure to her liking.
I’d like to start by saying my cats are assholes and anything I actually put effort into they generally avoid like most cats avoid the vacuum, mine aren’t scared of that noisy suck monster and sit around to watch me vacuum to make sure I don’t steal anything of theirs with it…weirdos right? All 6 of them, yes! We’re in the same boat though, my honey is allergic and a dog person… I already had 2 cats and then we compromised and got 3 kittens, his idea! LoL which turned into a baby happening despite my efforts to quarantine the little hussy. Anyway I am tempted to make one of these since it’s so simple and I already have everything but carpet scraps and I’m thinking I do have a couple throw rugs I wouldn’t mind cutting up that should be adequate… I’ve made my older 2 asscats beds that they loved till I actually took the time to sew everything together so out came the stitches and they went back to their beds…sigh* don’t know if I should bother but might make a great gift when mine refuse to go near it LoL
Been looking at cat post for quite some time now. Everytime I consider doing this I stop because I just couldn’t in my mind decide as to how to assemble a concept. Seen a lot of them but never really mentally built that me or took the time to plan one out. Thanks, yours looks simple and probably will construct one . Thanks for the incentive to do this. as far as the comments you received, you have handled them well, better than I would


223 Comments
Loren
Very nice cat condo! We are in the same boat (well, no allergies) and fell in love with an actual “Cat tree” kitty condo online at [website]. Since they were so darn expensive, we decided to build out own. It turned out great! Other than the 4 weekends of work it took to put into it!
Michele
Fantastic! I totally need this.
Sedge | noob-dad
I’d give it a whirl, but anything I touch with a tool quickly ends up out on the curb.
I’ve got skills like that.
Pete Fazio
It’s ok, a cat will sleep on anything.
Bryan
This looks great and I’m about to attempt it, but I have a couple questions.
1) If I don’t want to buy a pocket jig (I’ll probably never use it again), what’s the best way to attach all the platforms – just screw in from the side through the vertical support?
2) How do you screw the platforms into the tops of the 2x4s without the screwheads showing? Unless you didn’t actually staple the carpet to the platforms until everything was assembled? Hope that makes sense.
Bryan
Ignore my last comment, now I see where you say you just screwed right through the carpet! Sorry!
Pete Fazio
If you have good aim you can screw in through the sides. But you could also pre-drill at an angle like a pocket jig but you’d have the screw head protruding under the platforms unless you bust out a countersink bit as well. Marty might have a different idea.
Bryan
Thanks for the reply, Pete. Making god progress here, with carpet and wood all cut and just about ready for assembly.
One more (maybe stupid) question… In your instructions, you first assembled everything before carpeting, then disassembled, carpeted, and re-assembled. How were you able to find the pre-drilled holes once the carpet was installed over all of the wood?
Thanks again!
Marty
Hey Bryan,
There’s no science behind finding the pre-drilled holes, I basically referenced an upright or the underside of a board to try and find the holes, or I measured where certain holes were prior to upholstering. You can also poke around with an awl or pick tool to probe through the carpet and find the holes. Because I used a countersink for flat surfaces or pocket holes for other joinery, the holes are quite large and help to guide the screw…I hope that helps. Send us some pics when you get done!!
Conor
You declawed your cats? Nice going, idiot.
Marty
Thanks for your awesome comment! I bet you have cats. Can I declaw them too?
Marty
Oh, I meant to say…how do you know whether I declawed my cats or rescued two declawed cats from the shelter before they were euthanized?
You don’t. But I like my first comment better.
Wes
Idiot or not, I had my cat declawed – AFTER trying several, several alternatives: treats/training, spray bottles, hissing, rattles, battery-powered sound makers, boundary spray, even those God-forsaken kitty-claw covers. It’s been 3 years and I couldn’t be happier!
Also, I really, REALLY enjoy your comments :) And this is probably the easiest cat tree I’ve seen which inspires me to make my own if it’s nice this weekend. Thanks, chief.
Debby
Ooh, touché!
Cooper's Dad
Even if the cats were declawed after joining Marty’s family, I’ll bet whichever family member took the cats to be declawed loves that person just as much as every other member of the family.
Kate Gluvna
We have two rescued cats. One was declawed before she rescued us and the other one has her claws. Never assume someone declawed their cats. It makes you look stupid.
Toni
Wow, some people just have no clue, for one many of us have rescued animals that saved us after they were declawed, neglected and or abused,
2Cats
So tell me… which is better… to de-claw your cats and keep them? Or not to de-claw your cats and end up giving them up to a shelter because you can’t control your cats scratching? My cats are not de-clawed, but if the use of their claws started causing problems I couldn’t solve and made me love them less, It would be better for me to de-claw than to re-home (or risk possible euthanization by giving to a kill-shelter)
Marty
2Cats, thanks for your comment. I think Conor is passionate about not declawing a cat, and maybe good at jumping to conclusions. I, on the other hand, just happened to adopt some declawed cats and build them an awesome place to sleep and lick themselves.
C.E.Waffles
Does the type of carpet matter much? I have a huge roll of it from when I moved into my house. I would like to use it to make these as well, because I too feel they are WAY to expensive.
Pete Fazio
I doubt it makes any difference what kind of carpet you use.
Lex
Wow, what a jerk. I adopted a cat from a shelter and this previous owners neutered him and declawed him. Never assume. It makes an ass out of you.
Janet
This is AWESOME!! It was my goal to do something like this, but had no idea where to start so I got a rough wooden shelf at Ikea (of course, the cats haven’t figured out its for them…). I want to cover it in carpet and sisal, and knowing the prices/where to get them is very much appreciated! Thank you for posting the instructions, this is really going to help! :)
Pete Fazio
Thanks, Janet. Feel free to share it all over the internet and plaster it all over Facebook. :). It’s a pretty big hit on Pinterest.
Susana
Many thanks from Perú!
I only hope that building it is as easy as you describe it here!
I promise some pictures!
Pete Fazio
It might not turn out perfect but your cat won’t care and you’ll have saved a ton of cash. Good luck.
Susana
Oh! and you just save me $ 15.99 for an on-line manual!!!!
Pete Fazio
Feel free to send us cash. ;)
Andrew
Thanks for this guide! Built my own today with scrap wood from my Dad’s garage. It leans a bit and no platform is level, but the kitten loves it.
http://i747.photobucket.com/albums/xx116/andyroo81/b7af7e29.jpg
Pete Fazio
YEAH!!! That’s perfect. Nice job.
MChartrand
That looks awesome too! The not being level just helps your cat develop his balancing skills, so it’s actually helping them. :-)
Michelle
This is fantastic! Definitely the better choice! I’ve been looking for an inexpensive cat tower but to buy one you either sacrifice your wallet or quality and stability, and with a new very active kitten plus a 14 pound lounger cat you definitely need stability!
We’ll be trying this as soon as we can get all the supplies. (sadly we don’t have much for scraps/extra building materials around our garage)
Thanks for a great tutorial!
Pete Fazio
And of course you’re only limited by your imagination. You don’t have to necessarily follow these plans. You can come up with anything you want. Don’t forget you can probably find el cheapo supplies at a Mr. Seconds or a place like that. Everything is covered with carpet anyway so you can get ugly plywood and nicked up 2x4s for less that top-grade lumber.
Karen
This is great! I’ve been looking for a plan I could do easily. I will be adding a concrete tube for them to crawl into. I have the lumber in my garage already. I am going to look around for some carpet, maybe a remnant at the flooring store. Thanks for the plans!
Pete Fazio
Good idea. You could even do a carpeted tube vertically mounted on a flat base with a hole in the side near the bottom so the cat could climb up through the tube. You know how crazy cats can get.
Crystal M.
I have never been on your site before, but took notice when this exact scenario you described above played out last weekend. Child:”MOM! The kitten would luuuuuv that cat tree. Can we buy it?” Me: “Pssht… I can make that. And it will be bigger, better, stronger.” Child: “Oh God mom….. Can’t we just buy things like normal people!?” Actually, no, we can’t. And I’m not spending $150 on something made of materials I regularly keep in my garage. She probably won’t help me, but I’m doing it, and thanks for the great plans! :) I will be trying this out this next weekend and I’ll send in some pics!
Pete Fazio
AWESOME! Take some pics for sure and we’ll put them on Facebook. Of course there are lots of options to make cat stuff. The other day I saw an el cheapo night stand type of thing that someone carpeted the inside of the bottom shelf and put a PVC pipe wrapped in rope between the bottom shelf and the underside of the top. Then it still makes for a usable surface possibly. Especially if there’s a drawer. And go like us on Facebook. :)
Christina
I recently adopted two cats and thought I’d be the ultimate cat mom by buying a 5ft cat tree from the store. Oh they’ll have fun and play and share… Not quite! It’s more like 2 cats enter 1 cat leaves. I can’t afford another tree and found your website. It’s great! As it happens we’re gutting an apartment and will have lots of spare stuff. In fact, we have 3 floors length of concrete board tubing (don’t know the technical name). I could make the equivalent of a hamster run. The cats would probably just stare at it so I’ll stick with your tree for now. I’ll reality check my ambition and take pictures.
Pete Fazio
Sounds awesome. Every cat I’ve ever owned is just as happy with a cardboard box as it is with a huge climbing thing but they are crazy animals and we need to obey them and bow to their wishes.
Leo
Marty thanks, very detailed and clear plans to follow.
I have a large cat about 13lbs, I’m worried about the stability of the tower if my cat decides to jump on the 3rd(highest)step.
Also, can you recommend any way to reinforce the cat tower to prevent tipping.
Please comment, I’m very concern about this issue. much appreciated.
Love, Peace, Hugs, and Cookies
Leo
Pete Fazio
Hmmm, the good news is if you have a 13lb cat and they can jump to the 3rd step then you have the most athletic 13lb cat in the world and they should be in the cat olympics. You could always just make the base larger than specified or put it up near a wall and screw an L bracket into the wall and anchor it to the underside of the top tier.
An another note, if the cat does jump up there and knock it over they’ll probably learn their lesson and not do it again.
Leo
thx Pete for the good advice and the quick response.
beckasoup
Yay! This is awesome. My kitten will love being up high, my cranky old cat will love being away from the kitten, and I will love saving a ridiculous amount of money.
I’m thinking you could use PVC pipe for a lot of the structure and just spray mount the rope in place… any thoughts on that? I haven’t quite thought it all the way through… but I have an inkling it’ll work…
Pete Fazio
As long as you can secure the platforms to the columns then any combo of scratching things and platformy things will be awesome for your cat. You don’t want you cat taking a huge nosedive if your tower tips.
beckasoup
Meh, he’d love that part…Wheeee!
I volunteer at the local shelter and they have these sorta cat shelves in the cat rooms made entirely out of PVC and nylon webbing. The cats seem to love them (as much as you can love anything living in a shelter with 8 or 10 other cats). But anyway, I may blend the two ideas and see what I come up with. I’ll send pics if I succeed…
Pete Fazio
Please do. We’ll put them on Facebook.
Ivynator
Very cool! Just stumbled on your blog while looking for DIY cat trees. It’s nice to get an idea of the supplies needed to get this project going. Will definitely be looking at what other projects you have.
Pete Fazio
Awesome, thanks for stopping by. Spread the word.
Eric Verbeke
I saw your post, your break down of instructions, and the end product and it motivated me to build one of my own. I was in the same boat as you because my wife wanted one but there was no way I was going to spend $200.00. I did some slight modifications to your layout but followed your blueprints for the most part. In the end a 75% savings and a nice afternoon with my oldest son. Love the site! I have some pictures but don’t know what email to send them too. Let me know if you would like them. Thanks again!
Pete Fazio
NICE! Can you post the pics to our FB page? https://www.facebook.com/Dadandblog If not, email them to pete@dadand.com and I’ll get them up there somewhere.
Stephanie
You guys cracked me up reading this post. You are so getting dad of the year:-) Oh and the plans are great too. I’ve been collecting supplies to make a cat tree for at least a year… I have the carpet, scrap wood, sissel rope and even a kreg jig. I just couldn’t decide how to put it all together so I am going to try and tackle this project today. Thanks for the great plans
Pete Fazio
You’re welcome. When you’re done send us pics for our Facebook page.
Craig
I used your plans to make a cat tree for my cat. Total cost to me $21 for carpet remnant and rope, as I used some on the upper level too. Cat loves it. Thanks for the great instructions.
Pete Fazio
SWEET! Take some pics and put them on our FB page and share away. Or on reddit. Share and share.
Deanne
Hey guys. I was thinking that if you did want to add a curved platform or a tunnel-like level, you could use a cardboard building tube from a hardware store. I don’t know how much they cost, but they still have to be much cheaper than buying a pet-store tree. There’s a great tutorial here http://www.moderncat.net/2011/08/11/diy-kitty-condo-from-lowes-creative-ideas/
Another possibility would be to use a solid, plastic planter or pot and cover it with carpet or another durable fabric.
Pete Fazio
That’s what they really use in those expensive cat towers (I think). I’ll get Marty working on another cat tower made of tubes. Marty, get to work on the tube technology.
Mike
Gents, This is as good as it gets. Today, I was on a conference call and started googling pics of cat towers.. thinking maybe there is an inspiration. I could not bring myself to buy a tower for $100 or more…because I wanted a big awesome tower for jack and emmie, our two cats. Within seconds of seeing the blog entry, pics and text, I ran into the basement and got started..without hanging up (on mute of course). It all fell together, including disassembling and re-using the existing scratching post. 30 min later after the call ended, I discovered the plans… and that was it. What a creative masterpiece. I just fricking love it. Well done!!!!. tomorrow I wil cover it with carpet but I am thinking about reusing some pieces I already have … even if they do not match well. That cats don’t care!!! thanks for the inspiration and what a great site. Best to you both.
Pete Fazio
Thanks, Mike. You’re right, the cats don’t care. Only your interior decorator will care. Glad you liked the plans, spread the word.
Mike
Will do… thanks again to you both for this excellent site.
Meagan C
Hey-Just wanted to thank you for the easy to follow instructions! It inspired me to make my own (we only had wood for two levels) and it really was easy to assemble. Saved us a ton of money and had fun building it. We put the first one in of our boarding rooms and will make another for our cats someday soon. http://www.campwhiskers.com/blog
Pete Fazio
That’s awesome. Glad we could help you. Spread the word. (And like us on FB for more cool stuff, and nonsense. )
Brad
My wife and I decided to remodel our basement this summer and had a bunch of leftover materials that was just lying around. My wife stumbled upon your site the other day and didn’t leave me alone until it was built! You gave us a great plan to work from and our two cats love it! Just wanted to thank you for giving us kitty bliss!
Thanks again!
Roxie & Katniss!
Pete Fazio
Awesome! Love turning “scrap” into something useful. That’s why I’m a wood hoarder. Thanks for the comment.
The Professor
I am in the process of building a 5 level cat tree with a house on top. So far it hasn’t cost me a dime. I am using scrap wood from a construction site, carpet that I got free from my neighbor who installs carpet, spray glue glad I found in a house I rented, and screws and staples that I already had laying around. I will post some pics when I am done, but I decided to take a break to superglue my fingers back together. If anybody is wondering, peroxide is great for removing blood from carpet. Be careful people, razor blades are sharp.
Pete Fazio
If it’s FREE, it’s me. And, yeah, I had a run-in with a razor blade last week. http://instagram.com/p/SEJkRTpAYy/ Get us some pics somehow when you’re done. Maybe on FB.
Mike
wow, that looks fantastic marty!!!!… do you mind giving me the lengths you used for your 2×4’s??? I didn’t see those on your pictures anywhere. I’d love to copy this design for my cats since our old 10 year old one is falling apart. I think I can see all the dimensions of the mdf (the bottom was the only one I can’t really see but it looks like it’s 24×14)
Pete Fazio
Marty’s going to try and get some measurements up but I’d say it’s not an exact science. Make the 2×4 verticals however long you want and as long as it works out so you have the levels lining up you should be fine. I’d bet his are like 1 1/2′, 2 1/2′, and 4′. We’ll see what he chimes in with.
Marty
Mike, I’m not sure how I omitted the lengths of the upright 2x4s, but I can assure you Pete’s sense of proportion is pretty much right on. Here they are from short post to long post: 11.25″, 23.25″, 47.25″. You can see I was trying to get it to even out to round number heights accounting for the thickness of the MDF (.75″). And you were close with the bottom panel, it’s 24″x18″. Sorry for the delay, my tape measures seem to have grown legs. Legs that are about 18.5″ long to be exact.
Phil
Thank you for the tutorial, I used some scrap wood and 2 x 4 to build mine. I used remnant carpet and also bought a few yards at my local Home Depot. I drove in a support beam crooked; but the cats don’t care as the tower is sturdy. Thanks again!
Pic:
http://feelthefunk.com/kittens/images/IMG_1142.jpg
Pete Fazio
Aw yeah. Nice
Jenn
Thank you for the awesome blog post! I had a great time building the cat tree with my dad. (I mostly watched). It was a great way to do some father/daughter bonding while saving a lot of money. The hardest part was wrapping the wooden flat pieces with carpet. We used a very thick carpet, so the corners didn’t come out as nice as I wanted to.
The first version of the cat tree looks similar to yours. But it turns out that even though my cat was capable of climbing to the third level, he was too lazy to make the effort. So we added another level between the second and third level to make it easier.
Here are some pics of my cat on the tree.
https://www.facebook.com/media/set/?set=a.4187947902141.2149393.1387860217&type=1&l=06e6b338c4
Pete Fazio
Awesome. We’ll post your link on our FB page. Looks good
Tracee
Love the cat tree. I have a kitten that I rescued that had to have a leg removed so I have been locking for something smaller. Your tips on screwing together will help. The person was upset about your cats being declawed because of the agony the cat goes through. As a rescuer and animal welfare activist I have to say they went about that all wrong. The idea is to educate, not insult people. So sorry someone had to be so rude! Thanks for posting this! I will share with my rescue friends.
Marty
Tracee, thanks for checking us out. Share a photo with us once you get one put together, and thanks for spreading the word. As for the comment about the declawing, the problem was that the commenter assumed that I had the cats declawed. We rescued two cats that were already declawed. I clearly state I’m not fond of cats, I’m allergic to them, but deal with it cause my wife and kids wanted some cats. The important thing is that my children experience (and learn) the commitment and responsibility that comes with adopting a pet. We wanted to show them that there are many animals that need a loving home, and that you don’t always have to go to a store to buy “new”…whether it’s a cat tree or a pet.
Tracee
Yes, that was very rude of them. I am not a big cat lover but the little guy kinda grew us. He was only 4 weeks and so tiny and so sick. I am more of a dog person myself. I made my tree smaller as he is only 5 months and has the 3 legs. When he is more stable I will add on to it. I don’t wan’t him falling! I will grab a good pic today and post it.
Paul
Thank you for the awesome tutorial! I followed your directions and made a decent tree this afternoon. I didn’t have any scraps laying around (we’ve been doing a major clean up, and all that stuff went to the dump), but I do work at Home Depot. A few words of advice for anybody who needs to buy the lumber: The Home Depot will cut it for you as long as you have the dimensions you want. Since I work there I cut my own, but the Lumber associates cut stuff for customers all the time. Oh, yeah, I uploaded a few photos of the finished product: http://s222.beta.photobucket.com/user/vectornut/library/Miscellaneous%20Debris/Pictures%20for%20Forum%20Posts/Homemade%20Cat%20Tree?src=pb
Pete Fazio
Looks great.
Kathy
Nice cat tower but – shame on you for declawing your cats! That’s cruel!
Pete Fazio
Kathy, thanks for your comment, but shame on you for assuming Marty had them declawed. He rescued 2 declawed cats from a shelter.
Scott
I recently obtained an interesting shelf I wanted to turn into a cat tree. I have done this before with an old TV stand. However, I am looking for input on this one because it is a 6 foot tall, 4 shelf, straight up and down shelf. Just looking for some input and ideas from someone who has built a cat tree from scratch. Thanks!
Pete Fazio
Sounds awesome! I’d probably making it like a whole cat condo for real. Cut openings in each shelf so they can climb internally up to the top. Maybe alternate sides, left, right, left, you get the idea. I’d probably carpet all inside surfaces (except maybe the ceiling of each level), maybe one wall could be some other texture you could swap out. You could get crazy and maybe enclose part of the bottom shelf and out their litter box in there for privacy. Maybe one of the levels could be the kitchen and have space for their bowls of food and water. One leve could be the play room and have junk dangling from the “ceiling”. It could be awesome.
Scott
Well, it’s a little small that much LOL. But when I saw it I instantly thought cat tree. My first step will be carpeting the shelves. I am thinking the first two shelves they can easily reach, so not cutting anything on those. The last two shelves are where I really need some input. I am not sure how big an opening would need to be for them to easily just crawl up from one shelf to the next, without losing space for them to lay down. Or if maybe a ramp system to the third shelf would be prudent.
I can send you pics for some ideas if you would like. I can send you a pic of what I did with an old entertainment stand as well. It was nothing complicated, just $30 in rope and some old carpet. But when people see it they think its something I bought from a Pet Store.
ace
great tutorial. just wanted to say 5 gal buckets can make a great hiding places for a cat.
Marty
Yes. Our cats would love a 5 gal bucket. Also, paper bags. And boxes…shoe boxes. But yes, I see what you’re getting at. Maybe integrating a 5 gal bucket into a cat tree, carpet the inside/outside of it, cut a hole in the lid and BAM. Instant cat attraction device.
Matt
What are the measurements of the vertical pieces away from the ground floor piece?
Pete Fazio
You can really do anything you want as far as measurements but here they are from short post to long post: 11.25″, 23.25″, 47.25″. You can see he was trying to get it to even out to round number heights accounting for the thickness of the MDF (.75″).
Matt
Thanks for the quick response, I am good with the height of the vertical posts, but I was talking about the measurements of them in relation to the ground floor. It looks like they are 1.5″ away from the edge?
Pete Fazio
Yeah I think that’s about right. I’m not sure that was even really measured. I think that was just eyeballed and adjusted during build to accomodate the footprint of the other platforms.
Alina
Thanks for the cat tree plans! My partner and I found your plans this morning and made a cat tree today! In wrapping the 2 x 4s used WAY more than 50 ft of rope. Cat loves it so far – but that could have something to do with the catnip. We still hope it will be a good alternative to our much more expensive couches. Loved the PDF plans.
Pete Fazio
Awesome. They’ll love it for years.
Carlie
This looks awesome! Thanks for posting! About how much rope was used to wrap the single upright? I’m thinking of doing 4x4s so I’m trying to figure out how much rope I need for two 4′ (4’x4″x4″) and two 6′ (6’x4″x4″) uprights.
Pete Fazio
To be sure you might have to just go to Home Depot and do a little test by grabbing some wood and taking it to the rope isle.
Marty
I used almost all of the 50 feet of rope on just the 12″ tall 2×4. And that was 1/4″ sisal rope. So 50ft rope = 1 foot board.
barb
Hi guys!
so I am looking to build a new cat tree for my cat as she needs a new one every six months and I want something more durable then the 40$ ones i get her at walmart. the only thing is that I move alot so I need to be able to take it down as much as possible. the ones that I get for here have a headless lag bolt that screws into the top of each pole halfway then the perch boards go on then the bottome of the next pole screws into whats left of the lag bolt. I want to figure out how to do this with a 2×2 piece of wood shoved down the center of pvc pipes…..how do I do this?
any help would be greatly appriciated
Marty
Barb, you could probably use a dowel screw, which is essentially what you described as a “headless lag.” It’s just like a lag bolt but threaded appropriately on both sides. Other options could be a stair rail bolt, which is machine threaded on one side and has a side like a lag bolt. That involves a little more work to use.
Do a search of “dowel screw” and “stair rail bolt” to see what they look like and examples of use.
I suppose you could use a 2×2 with a dowel screw on one end and assemble just as you had described. I would think that the coarse threads in the wood may only be good for a few teardowns before they wouldn’t hold very well anymore. If you want to reuse the 2x2s indefinitely, with repetitive assembly and disassembly, then you should consider using the stair rail bolt and disassemble from the machine thread side.
Another option is to use a length of all thread (a bolt that is headless, and has machine threads the entire length) with a threaded insert.
Check out these threaded inserts, dadand has used them before: http://www.ezlok.com/Home/index.html
Try looking for flanged soft-wood inserts.
Good luck and let us know how it goes.
Dennis
Just found this page via google. Awesome plans you have here and I’m going to build one this weekend. I’m definitely favoriting this page and coming back for more!
Pete Fazio
Cool, hope you make an awesome one. We put a lot of nonsense on Facebook as well so find us there. And tell your friends and family.
Elizabeth Boothby
I live in an apartment and so I dont have a garage or any of the bigger tools/less common tools due to lack of space. Any suggestions on how I can make a big tower without having to spend a lot of money on tools? For example can I use a hammer and some small nails instead of the stapler? I dont know much about building anything but I am interested in learning.
Pete Fazio
I’m sure you know from experience that cats will sit on anything, especially if they can sit up high and look over their domain. I think you could build almost anything and it would work. Sketch it up on paper, have fun. You could probably nail carpet to the flat surfaces with upholstery tacks or something. For rope you could always tie it off at the top of the vertical posts where you want rope, wrap it all around, then try and tie it off at the bottom. Then just sprinkle some catnip on it and the cat will be all over it.
Ebsan
I’ve gotta say, for my first time doing a project like this, you guys made it super easy. It turned out great and most importantly my cat loves it. I’ll admit, its not as polished or nicely made as yours, but it stands and gets the job done :) Thanks for the post. It saved me at least $100 and I just picked up a new skill.
https://skydrive.live.com/redir?resid=4C1EF9300376A1E3!2342&authkey=!ACKZl3Tcr0NswyA
Pete Fazio
Wow, nice work. It looks fine to me. Especially something that the cat is going to shred up anyway.
James Rilett
Hi, I want to try to make this tree but I don’t really understand from your instructions how to make the beams the tall pieces which hold the platforms together. What are they made out of and what are the measurements thanks.
Marty
James, the beams are just 2x4s. Download the plans and it explains materials and has a cut list. Thanks for checking us out. Feel free to post your creation to our facebook page!
suzi que
Moved in with my guy 5 months ago…. he has dogs, I have cats. My kitties are staying with a friend while we figure out a way to keep both sets of pets happy. I think this is a good place to start. We have a very high vaulted ceiling so I am planning on a bigger version… wish me luck!
Pete Fazio
Good luck.
Kaitlyn
looking forward to building this for my cat, my husband wants to kill him half the time for jumping up on certain pieces of furniture he shouldn’t be, but hey he’s a cat, its just what they do.
I am by no means good with tools, give me something from Ikea and I’ll still screw it up somehow, but for some reason the step by step guide with pictures makes me think that I’m going to pull this off. Just wanted to say THANKS ahead of time for posting this, also a little luck might help but hey as long as i don’t lose a finger its a win win for me and Butters (the cat)
Marty
Good luck. you can do it. Butters is counting on you. Post your finished pics to our FB wall!
WOw
Wow, don’t you know how dangerous MDF is? Jesus fucking christ.
Pete Fazio
Are you talking about Micro Data Format, Mule Deer Foundation, Main Defense Forces, Maryland Death Fest, or Medium Density Fiberboard? In any case, YES.
Suzi Que
The comments are almost as great as the info you guys put out there! I might have to make a FB page just to “like” this site. My Dogs Farts ARE dangerous!!
Chad
Thanks a lot for this post. It was very helpful in building one myself. We just got two kittens for the kids decided I was not spending $100+ on something I can make from the scraps in my basement. The only thing I really needed to buy was the sisal rope. Great post, thanks again!
https://skydrive.live.com/redir?resid=A092D7FBCBEB21C!710&authkey=!AOkmJvBv4phHoVg&v=3
Pete Fazio
Nice one.
Teresa
Thanks so much for the great and easy to follow plans. Just finished my cat tower tonight and in the end it cost me about $20 to make with stuff I had already kicking around. While it’s not perfect, the cats love it!
Amanda
Is there another way you’d recommend to secure the platforms without a pocket hole jig?
Marty
Amanda,
Sure, you could drive screws through the upright post into each “shelf” but you’d have to use a 3″ screw. Another option would be to use some corner brace brackets, which would probably be the easiest to apply and would support each “shelf” with no problem: http://www.lowes.com/ProductDisplay?partNumber=66938-1277-MP121BC
Thanks for checking us out, share some pics on our Facebook wall when you’re done!
Bill in Endicott
I had the day off of work, and this is what I did. The only thing I did different was to add an ‘L’ bracket to the top level. One of our cats is part Maine Coon, and he is huge! It turned out great, and the cats love it. It cost me $37, but I bought a box of wood screws that I didn’t need after all. Thanks for the plans!
Ginger Osborne
Great instructions! I have a tidbit to add – if you can find a cool cedar tree, you can remove the bark and sticky cambium layer with a pressure washer easily, and then you have a beautiful tree to start your project. Making 2 for my grown kids for their Christmas presents.
Kenn
Hey Thanks a lot for the idea. I adopted a abandoned cat a few years ago and he has become my best buddy…. (even after I de-clawed his front paws to save the leather in my house). I did make some altercations to this by cutting out notches in the 2×4’s to have the floors sit into them and then screwed the 2×4 into the floors thus doing away with the need of buying a jig. It also gave strength and extra weight bearing to the structure. I had so much fun making this that I made 4 of them and am now designing and building an even bigger and more complex one.
Tim
I just adopted to 10 week old kitten brothers from an agency. I am definitely going to use your instructions to build them a tower. You guys rock.
Karen
These DIY cat condos/trees look great! I am currently building a kitty enclosure for the backyard that I am planning to have something like this inside for them. It won’t be totally out in the open against the weather since it will have a roof, but the sides of the enclosure that aren’t against the house will be made of Phifer Pet Screen. That being said, are there different materials choices that you would recommend for a somewhat outdoor condo? I don’t really want carpeting that may mold if wet from rain, for example, but I don’t want to just use treated wood either…seems kinda boring for the cats. Any suggestions you might have?
Pete Fazio
I’d use treated wood, outdoor carpet, and marine rope, but sisal rope should still be fine outside for quite a while.
Karen
Well, I finally built it today. It was actually even easier to build than I thought it would be, and so much more durable than the ones you can buy at the pet stores! I think I will be making another one for inside the house, too. It will definitely save my ottoman from being used as a scratching post. Thanks so much for the plans!!!
Pete Fazio
You’re welcome. Got pics?
Karen
Here are a couple pictures of it with one of my cats checking it out in the first pic. I haven’t even moved it to its permanent location; it’s still sitting in the middle of my kitchen.
I had a little trouble with the carpet since I had never done it before, but I think it turned out nice. I’ll definitely have to make a second one for inside the house since my inside cat obviously likes it.
http://img.photobucket.com/albums/v217/Dacia/20140327_012216.jpg
http://img.photobucket.com/albums/v217/Dacia/20140327_0106231.jpg
jessica
Can you make a fantasy cat tree? If you google it you will see how detailed the trees are.I would love to know how to do them!
Brady
You use 1/2″ MDF on the blog post, but your instructions recommend 3/4″ sheetgoods. So, how is the half inch holding up, and would you recommend against using it?
Pete Fazio
I haven’t heard his cats complain so I think it’s fine.
Mark
$20 in carpet and $10 for the sisal rope. All the rest I had as scrap materials. I put the rope on the 2nd floor support and only went 3′ high with the 3rd floor. Cats love it. Thanks for the plans.
http://i450.photobucket.com/albums/qq226/AlbanyHDTV/IMG_2322.jpg
Pete Fazio
SA-WEET! Awesome Cat tower. You’re welcome for the plans.
Colin
Thank you for this tutorial! It is very helpful, especially with how expensive good cat towers are. I was wondering if you knew of any other designs around the internet for entire maybe a more expansive tower for more cats, or anything else. Thanks for this post!
Paty S.
I found your site on Google and I cannot thank you enough for putting this up! I had planned on just building the cat shelves and buying a couple trees, but this just saved me a couple hundred bucks and it looks like fun. I have 3 cats at home and 2 of them have more energy than they know what to do with. I can’t wait to try this out, thanks a ton!
kayla
Hi I just found this sight after I was at the Petco near where I work.I’m adopting an 11th month old kitten from the shelter that works with the store.But looking at cat towers,they looked like something I could build at home for a bit less and make way nicer.So thats what I decided to do.I’m sure she’ll love the tower once its finished,thank you!
Marty
Kayla, thanks for checking us out. Build your own. Then spend ht emoney you saved on catnip. Your cat will love the tree even more.
jed
Yep, helpful, but don’t like ‘hating cats’, especially your own, even with allergies. Not their fault, and it is enough to mention not liking them once. Hope the tail pulling stops too!
Honey Intanupat
great idea!! You are super dad!
Steven
Googled cat tower plans last Friday, came across this, stopped by Home Depot on my way home and slapped this together in a few hours on Saturday. Thanks for the plans! Even our fat cat can make it to the top and she loves hanging out up there. And this gave me an excuse to buy a staple gun finally… Thanks again, will add y’all on Facebook! Only edit I would make is to purchase 3″ screws if you don’t want to invest in the pocket hole jig
Marty
Thanks for checking us out Steven. I think I wanted an excuse to use my pocket hole jig, but glad to hear it worked out with some 3″ screws.
Barb
Our high school woodshop teacher used your plans and had some of the kids make one of these for the local animal shelter. It’s great! I am stashing it at my house for now as there is a new animal shelter being built here and we want nice new stuff to go into it when it’s done in the fall. My three former shelter kitties got to check the tower out before I put it under wraps, and they pronounced it “purrfect”! Thanks!!
Pete Fazio
Wow, that’s cool. Thanks for the note.
DeeAnne
Thanks so much for the great ideas! i spent a good 45 minutes in the plumbing section of Lowes today piecing together different ideas that were zipping around my mind. I had a small audience before I was done…lol! Now I know what I’m going to do…for the most part. Using mostly your plans (and adding some of my ideas), should make a cat tree that’s the total BOMB! I’ll send pics when I’m done. Oh…and for the mental midget who was posting about your cats being declawed…really dude? I guess I must have researched the wrong thing…I was under the impression this post was about helping folks make something good for their cats. Silly me!!
Marty
Thanks for checking us out! Feel free to post some pics on our FB page (icon on the very top right of this page), I look forward to seeing your cat creation.
SMP
Finally found a good set of plans!!
Can’t wait to start.
1 questions:
1) What do you think the weight limit would be on the top platform?
My cats not fat, but I don’t want the cat up there and have it break, and she never uses it again.
Pete
The more centered you make the platform on the top post the less you have to worry about weight. But with a couple of screws down into the top post I’d think it would handle even the heaviest of cats even if it was cantilevered a lot.
Frances
Habitat for Humanity restores are a great place to buy large pieces of carpet from $1-$10 per roll. I think I would have to get a bookcase from there, probably $10, and cut sections out. Luckily, I do have a furniture friendly large staple gun to apply the carpet.
Deanna
This is awesome. Someone may already have stated this, but faux fur is a good idea because cat claws won’t get caught in it like carpet and it does not teach your cats its okay to claw carpet.
Monty
I’m not sure how to post a picture here. But I made mine in just a few hours today and boys of my cats love it. Thanks for the great instructions!
Pete
Hey Monty, you can’t post the pictures here, but I think you can on our FB page and share them that way. https://www.facebook.com/Dadandblog
KT
Uh, yeah… This plan f-ing sucks. First, screws don’t work going through damn carpet. Second, 2 inches isn’t long enough for the wood AND carpet. You would need 3 or 4 inch NAILS. Third, the whole thing turned out wobbly either way. Its a piece of crap and I followed every single direction in your plan. Good job
Marty
Sorry you failed, but blaming it on the plan is weaker than your wobbly cat tower. At least you now have something to line the litterbox.
Jo
:)
Karen
I’ve built 3 cat trees using these plans, and my cats love them. Two of them are used as fun ladders for the cats in their “catio” which is connected to my screen porch through a tunnel. They withstand the beating my 6 cats give them. The third tree was a gift for a friend who liked mine so much she asked me to build her one for her cat. Thanks so much for these awesome plans! And my husband thanks you since we didn’t have to spend tons of money on store bought cat trees. I love diy projects anyway. ;)
Monty
I wonder if this guy feels stupid kmnow knowing that in all the comments posted, he’s the only one whose didn’t come out perfect. Sometimes it’s the not the tool being used, but the tool using the tool.
DeeAnne
Quick follow-up on my post from 07/11…I found this cool stool at Goodwill. It’s about 5′ tall, with the seat being 4′. I’ve started turning it into a cat stool. I’m not done yet…all I’ve done is wrapped rope around the legs and filled in the top with strips of fabric and hung a few toys on it. I’m busy packing for a move right now – but it has made a great place for the 2 cats to sit in the door and watch the world go by. Had I not found your page, I don’t think I would have even started this. I still have plans for making a tower using your plans as well. I’ll post pics of both on your FB page.
June Huston
Awesome DIY “cat thing”! I’ll try to make one for my cats! Or if I have to be honest – I’ll try to convince my husband to do it! :D
Mike "ex-genius" Kelley
Thanks so much for this — we’ve gone crazy trying to find suitable cat trees over the years (well, having cats will drive you crazy so perhaps it wasn’t the search for the trees themselves…). Anyway, we (old people) are about to attempt to make two or three of these.
Here’s my question: I want to make the floors with ledges around them (not circular — not up to that — but the tree to the far right of your first image seems to show what I mean) and I do believe I can construct them properly (probably use pocket holes). Carpeting the whole thing, however, seems daunting. I was thinking of making the sides of each floor out of 1×4. Do you think it would be better to carpet each and every side and the base and assemble them all together or is there any reasonable way to carpet the whole shebang by doing cuts as you do when you carpet the base? I’m having a hard time imagining the kind of cutting and folding that would require, but taking the time to carpet five pieces for each floor might make me crazier than I already am.
Marty
Mike, thanks for checking out Dadand. I understand what you want to do. And you’re right, carpeting something like that can be daunting. I would probably carpet a floor in three pieces. I’d assemble the floor with the two long sides, then carpet it as one piece, leaving the ends uncarpeted. Then I would carpet the two remaining sides individually and then assemble them to complete the “tray.” I threw together a quick drawing to explain: http://www.dadand.com/wp-content/uploads/2014/12/carpet-cat-floor.pdf
Mike "ex-genius" Kelley
Thanks for the quick reply.
Yeah, I did think of doing it that way, but after looking around on the web for various ideas I think I’m going to try a slightly different approach.
I think I’m going to put the whole shelf thingee together and then take a piece of carpet and kind of wrap it around the whole thing (the sides), gluing and stapling. Then I’ll cut each corner and kind of fold it down the interior (cutting somewhat similar to what you show in the cutting and folding guide above). Finally I’ll cut a piece the same side as the interior square and paste/glue it in to cover the seams from the other carpet (it will be lumpy, but cats kind of love lumpy, oddly enough).
I *think* that will work — your suggested approach is actually neater/easier except that it has the issue of not being able to use the same size sides (I’m planning on using some 1x4s I have and don’t want to cut other than length).
Then again, I may not have the slightest idea what I’m doing — all of my wood working experience was about a half century ago so it will be interesting (I still have a fairly unused Sears rotary table saw that I’ll have to dig out to do all this stuff :>).
Thanks again for taking the time to do all this explanation for us newbees.
mark bass
“progressive-natural carpet” was mentioned in the instructions for DIY cat tower. looked at home depot & online and couldn’t find it. any ideas as to where to buy it?
thank you,
mark
Marty
Mark,I basically chose in-stock carpet from the home center, something with a low pile. I tried to find something that really just had the colors I wanted in it so it wouldn’t be too out of place in my living room. It wasn’t the cheapest and certainly not the nicest they had. I think really any carpet with backing would work—it’s a little tougher than the non-backed carpeting they use for speaker boxes and automotive applications. Good luck.
Mike "ex-genius" Kelley
One more question, if you please.
I’m going to get the Kreg Pocket Hole system and in your directions you talk about using 2 inch screws — what size do you recommend I get using the Kreg in the pocket holes?
Marty
Mike, I didn’t even use the Kreg screws, I save/ration those for other projects. I think I just used some 2″ coarse thread drywall screws I had laying around—they worked in the pocket hole just fine as long as you don’t “overseat” them.
Mike "ex-genius" Kelley
I got the tree together just fine… and now I need to carpet it. What length staples do you recommend? (I notice you said you used a 1/2 inch stapler so my assumption is the staples are also 1/2 inch long, but I use an electric stapler with variable lengths).
Marty
Mike, I honestly can’t remember what size staples I used. I probably used 1/2″. If your electric stapler will shoot 1/2″ staples into the wood you used, then I’m sure that’s fine as long as they aren’t protruding on the top side! You probably used 3/4″ wood so no worry. I used one of my air staplers which shoot anything from 1/8″ to 3/4″ wide-crown staples. Good luck and I really want to see your finished effort!
John
I honestly feel that making your own cat tree is the best way to go…a lot of cat furniture is so hit and miss, but if you make it yourself, you can make sure that it’s well built and balanced.
Thanks for the detailed write up, Marty :)
Jake
Am I doing it right?
http://i.imgur.com/8SkP5bO.jpg
Marty
Dog condo. Love it.
Lei-Ann
I was just reading the comments about declawing a cat whose scratching you can’t control. While you can try the usual sticky tape or orange scented spray, the best solution, in my opinion, is those wonderful nail covers you can buy at any pet store. No more scratching, and kitty gets to keep its fingers and their bones. Oh, you didn’t know declawing includes removing the finger bone up to the first joint? Imagine having that done to you. Also, for those of you unfamiliar with declawing, it can affect a cat psychologically also, and not in a good way. It can turn them mean, or take away all their self-confidence. It is illegal in several states, and I wish it were in every state. It is just wrong. Bless those of you who adopted a declawed cat and are helping them build up their self-confidence again. I have two cats. Neither is declawed. However, I am severly allergic to the bacteria one of them has. She has put me in the ER 3 times and twice I nearly had to have surgery due to the resulting infection from an accidental nail scratch. She goes to the vet for monthly nail trims as it is too risky for me to do myself. There is nothing that would make me declaw a cat, and there is no chance she is going anywhere but here in my home. Both of my cats were high-risk adoptations, but with training, patience and love are now lap cats. Please don’t declaw, it is inhumane.
Marty
Lei-Ann, thanks for sharing the info on declawing. As you read, I adopted cats that were declawed already. I’m glad to give them a home with or without claws. But a few commenters here missed that part. I jut want to focus on the cat tower, that’s all.
Karen
I just wanted to thank you again for your amazing cat tree plans. I have made 2 of these trees for my cats and 1 tree for my friend’s cat. I have also used these plans and learned to determine how to create plans for other kinds of cat trees that I’ve seen pictured on the internet. I have a “catio” in the backyard (out of necessity for evil cat-hating neighbors…I had to build an outdoor enclosure for my cats to ensure they aren’t taken to the pound or killed! Sad that I had to do that because of evil neighbors who just moved in last year…) and these cat trees are used in the catio daily. Thanks again for the plans. I saved a lot of money using them rather than buying the cheap $150 pet store trees!
Pete
Thanks for the kind words, Karen. We’re so glad there are so many other cheapskates out there like us. You sound like a good kitty mommy (if that’s a thing).
Dawn
I don’t think it matters, but I did want to mention that the thickness for the sheet of wood is listed as 1/2″ on the webpage instructions, and 3/4″ on the printed instructions. I went with the 3/4″, because I didn’t notice the difference until after I already bought it. Again, I doubt that it matters, but I did panic a little when I thought I screwed up before I even started. He I go, wish me luck!
christine saunders
hi the cat condo looks great if I was to use round poles as I have a few laying around how would I attach it to the base
Pete
Hmmm, round poles… I’d probably drill and screw into the top or bottom of them up through the base or down through the shelves.
brandy
Im goin to try this n this is not towards anyone i understand that when kitties rescue an animal kitty
Jamie
Thank you! We aren’t great woodworkers so it was easier for us to get some L-brackets to hold up the posts and platform. Then we went back and added extra screws to ensure everything was stable. To keep the project cheap, I called a local carpet installer and asked if he had any remnants. He was happy to give me some since he trashes them anyways. In all, it cost us $25 (2×4, screws, rope, and L-brackets) to make.
Drew
Pete & Marty- just found your plans over the weekend, and although it took us more than 2 hours (2 days) my wife & I really enjoyed this project! The pocket holes are key compared to brackets! We ended up lowering the 48″ post to 36″ as our cat couldn’t get down easily from the top. Overall, great plans and our cat loves it!
-Drew
.
.
Blair
I built this fabulous condo in 2 days, the cat loves it! I would say the math is off a little as 14 + 16.875 + 18 = 48.875, and the wood is only 48″ long so I shortened the 3rd floor by 1 “. Basically I cut the 18 ” and the 14″ piece and what was left was the top floor . The pocket holes worked great and I used some 1 5/8″ deck screws and didn’t bother cutting a way the carpet. I used 2 1/2″ deck screws to attach the 2×4’s drilling pitot holes in the particle board I used.
Mr. B
The PDF of your plans is really slick: (Illustrator I presume?) I just adopted three kittens off the roof of the junior high where I teach English. As a former middling construction dude I think cat condos are kind of awesome in all their iterations, but like you said, they’re cheap crud then marked up 200 percent.
I hope I can do your plans justice. Thanks for the details.
Drew
Mr.B- we just built this condo & our cat loves it! One modification we made to the plan was to shorten the top floor by 12″. We found our (very) agile cat couldn’t quite get down to the 3rd floor. Otherwise, it’s bewn awesome! Good luck with your build!
sue
Hi: Pete: read your instructions and since I am already pretty good with tools (despite the fact that I am a woman)I pretty much figured out how to do it on my own, but I wanted to say that I think you are so funny with your answers. When the cat tower business comes to an end, you outta go into stand up comedy.
Pete
Despite the fact that you are a woman? That’s ridiculous. Tools know no gender. Don’t sell yourself short.
leigh
A friend of mine just moved into a new house and we’d like to get her something to detract her 2 cats from destroying any new furniture they may get. This is going to work perfectly! Thanks!
Simon
Pete,
I am trying to find the same carpet you used on Home Depot but can’t see it. I know it is not important but I really like the look of the one you used. Can you let me know the name of it?
Pete
It looks like Marty just used some kind of Berber Loop carpeting.
Marty
Simon, I can only say it was an indoor/outdoor berber-type carpet with bits of tan and green in it. My local store doesn’t have it anymore as this was a couple years ago when I bought it.
Amanda C
This is awesome! My cat likes anything from cardboard boxes, to cat towers. He doesn’t like toys much unless it’s yarn so the best I can do is make him a cat condo! (:
Mindy
Dangit. I only have a hand saw, a hammer and some nails. I guess I’m sticking to a cardboard castle for now. Good job though! :)
Karen
Mindy, I have made a three of these cat trees, and the first one that I made was using just a hand saw, hammer, and some nails. :) I used the plans to know what sizes to cut the wood and how to put it together. I had to get creative with positioning the wood to properly hammer in some of the nails, but I got it done. That particular tree is still enjoyed by 5 of my cats after 2 years (I’m a married crazy cat lady, lol).
Matt
Marty,
I thought you just built righteous cat towers from household items, but now I understand that your real game is mercilessly adopting declawed cats that would otherwise be killed, even though you are allergic, in an effort to bring joy to your kids, and maybe even a few life lessons in the process.
Cat tower? More like pain and suffering tower.
petsareyours
Very cool furniture for the cat. And very helpful tutorial for making cat home. Great share
Jeffrey
Another satisfied customer. Your instructions were great. Our tower turned out fantastic. A little longer than 2 hours (I am not an expert DIY guy) but it was satisfying to build it as a family.
May
For those of us who are constructionally challenged, would you mind going into a tiny bit of detail about the concrete form you were referencing in order to construct the curved platforms, or maybe telling me where I could find some info?
I’ve been looking around online for a couple weeks on a good way to create my own and this is awesome!
Pete
This is what we mean. It’s a tubular concrete form: http://www.lowes.com/pd_10150-286-692203_0__?productId=3005464
Laura
Proud to say we are now owners of a new cat tower! We made it a bit taller and added a little house on the first floor and toys dangling under each level. Our cat got on it to play before we were even finished with assembly.
Peyton
Thanks for the website. My family has 5 cats and they climb on everything. I also won’t spend the money for cat furniture so I am going to try this.
Mo
I was googling building a cat tree and came upon this site. I have a question that may have been answered but there’s a lot of comments here. Has anyone had trouble with the carpet fraying, and if so how do you stop it?
I built a heavy duty scratching post and the carpets keep fraying.
Marty
Yes, after some time the carpet can fray. I think it depends on the type of carpet. The type I used was a close loop weave, which I think was more likely to fray. But I think it just comes with the territory, so to speak. It took over a year before I saw anything fray. For the scratching post I used sisal rope, try that instead of carpet.
Mo
Thanks. Just wondering. I actually put a combo of Sisal rope and carpet on the post itself, then carpeted the base. I think it stopped fraying after it went so far. And I’m used to the “territory” so it didn’t bother me. :) Wanted to make another for a friend though, and looking for ways to improve. Also want to try a tree.
Cat
Hi, we made this. It took my daughter and I more than 2 hours, but did it with a jigsaw, power drill and staple gun. We did the sisal rope on the two foot pole because our cats stretc when they scratch. It came out pretty good, next time would use plywood and cut back the carpet as suggested. Thanks
Even moms can do it
Marty
Awesome Cat Tree! Thanks for sharing!
Cat
https://imgur.com/4ed3i0w
Jackie
Was looking at cat plans and loved your post. Kept looking and this popped up. I think she stole your project photos. Hope you got reimbursed for all your time and creativity. http://www.diynetwork.com/how-to/make-and-decorate/decorating/how-to-build-a-diy-cat-tree
Pete
Hi Jackie, thanks so much for looking out for us. We love you for that. My (Pete) wife is Emily Fazio, the author of that post. She works for DIY Network/HGTV and we let her use our partial content and there is a link back to our post in STEP 1 but I DO wish it was bigger and deffer. ;) Again, thank you for the heads up.
Robert
Thanks for posting! Got it roughed together and appreciate all your thought and planning that went into this. Sure made the project go smoother.
cindy
hey, this was extremely helpful! thanks so much. i think i’m going to ask my husband if we can cut another piece of carpeting to put underneath the 2nd level–in case kitty gets a WILD HAIR–don’t want him catching a claw on a screw head. we’re only doing 2 levels due to floor space being a premium here (higher means wider base for stability i figured) and well, it’s really muggy today and we’re thinkin that ANY cat tree’s better than what the cat currently has (none)! all the hate about declawing and the haters didn’t even ask about if the owner was responsible for it having been done–come on folks, get off yer high horses and think before spewing bile! anyway, GREAT tutorial! definitely going to start following on facebook now. we had everything needed to do this in our garage already so it was nothin but sweat equity! thank the gods for left overs!
Pete
Cindy, you make much too much sense. Are you a real person?
Chad
Echoing some other folks but this was very helpful. Just finished my build this past weekend. We altered the plans a little bit but the instructions you had made that a very easy thing to do. We’re going back to add a little house on one level but my daughter is very happy – and her cat Spike is even happier. Will get around to posting a picture to your FB page. Thanks.
Marty
Chad, thanks for checking us out. Hope we get to see a photo of your work!
elsie
Hi guys! thank you so much for the instructions on how to build a cat tower!
Now I can ask my son to build one for me…or maybe I will tackle it myself!
About that Jig thing…I see one that is very simple and costs only about 20 bucks. I am looking into building some pull out shelves for my cabinets and I will need one of those…so it will be worth it for me to get one..
By the way..as a teacher, I really appreciate your very clear, concise instructions and as a beginner I REALLY appreciate the PICTURES!
Dennis L.
**Update** Not sure why it took so long for me to leave a comment… I built this nearly a year ago with scrap plywood and 2x4s that I had in the basement and carpet that I bought from the local home imrpovement box store. Since I didn’t have to spend any money on lumber, I decided that a new pneumatic stapler and Kreg pocket hole jig was in order. The pneumatic stapler was ideal for attaching the sisal rope and carpet. Great plans, the two cats love it. Our one cat with claws scratches on this instead of the new couch. I don’t think you can teach a cat NOT to scratch – you have to provide a place that is okay for them to do it. I had scraps of 5/8″ OSB left over from the Dadand.com shelving project that I previously did, so that made up the platforms. The cat condo is sturdy enough that my kids sit on it! Thanks again for the great idea, plans, and humor!
EvilVegan
Hello, I am not actually building but am trying to modify this cat tree: http://www.frontpet.com/pet-furniture/frontpet-apex-cat-tree-tower-23-l-x-23-w-x-68-h-modern-cat-tower-designer-cat-furniture-luxury-cat-tower.html
A few reviews stated it can be a little wobbly, and when mine arrived, one of the tiny, plastic feet had broken off. I’m thinking about replacing all of them with something more stable and protective of my wood flooring.
I’m wondering if any of these would be recommended:
http://www.rockler.com/slipstick-grippers-with-tilt-n-slide-chocolate-4-pack-2in-dia
or
http://www.rockler.com/slipstick-4-1-2in-x-6in-heavy-duty-self-adhesive-felt-pads
Thanks in advance for your response!
John
We had two rescue cats, got them both together about fourteen years ago, unfortunately died so we ended up adopting my brother in laws, she’s about 4 years old and loves our old scratching post which is how I came to find your site, love the tower, now my nine year old son wants me to make one, only problem is I’m bodgit and scraper with did skills, good thing is I know know what a pocket hole is, which me luck, Yorkshire, England:-)
Cheryl & Rocky
Love this idea as a starting point. Hubby is a disabled vet, so we don’t have a lot of money. We’ve been brain storming the final plans. E found some remnant carpet in our attic from the previous owners. We have new neighbors who are recarpetting and have us some pieces. At work I got a 10″ wide tube that we will lay flat for a little cubby on the second floor. Had some 4*4 posts, but wasnt sure about using something that big. Looked on Craigslist and found someone 2 miles away getting rid of some plywood and 2*4s for free. Picked up what he had. When I sent a thank you, he said he will have more and some carpet next week. So far all we had to buy was some glue and the rope. The rope was $5 for 100 feet of 1/4″ at Walmart. Going to make a separate cat scratch post with one of the 4*4s.
Cheryl
Tried to leave this message this weekend from my phone.
Hubby and I have been looking at building a cat tree for new kittens we will be getting this summer. We didnt want to spend a lot, since we are on a limited budget.
We have new neighbors who just replaced their carpet, and were kind enough to give us some reminants. We also found some in our attic. Then on Craiglist we found someone who was getting rid of some plywood scraps, and 2x4s. After looking at them the next day, some may not be in good enough condition. But the guy said he should have more this weekend, and he has some carpet pieces also. My dad says he has plywood and 2x4s we can have too.
So at this point all we bought was some glue and sisal rope (which stinks like a garage for some reason). The rope we got at Walmart for $5 for 100 feet of the 1/4″. Can’t wait to see how it will turn out. We augmented the style a little to add a round tube on the second shelf (a hard cardboard tube i got from work)
Ryan
Hey Man, what a step by step guide on DIY cat trees! As I’m researching online a lot but this is the really helpful one that can guide even a non-professional to easily build one. This guideline should be in my resource list that will help my viewers too. :)
Grant
Awesome forum, five years old and still getting comments. There are lots of types of carpet at [business] here in Daly City. What kind is the most durable and pleasing for scratching? Some types have the typical criss cross weave of thick fibers, but some have other complicated weaves. Which one would last the longest?
fredflint
I am in the process of building a kitty skyscraper this weekend. I think I purchased the same rope you did. I also stopped by the home depot carpet section and picked up some tubes the carpet is rolled on. I think it give a more professional look and I can put a block of wood in where I need to, saves some weight too. I also went to the scrap bin and was able to pick up some nice lumber at 70% off. a few boards were 15′ long and had a twist at 12′ so very usable and they cut the boards down so I could fit them in my car. The cardboard tubes I brought my cordless saw to cut down at my car. the plywood I am going to have them rip it into 2-24″ pieces so I can fit it into my car.
Skip Bell
I want to replace the worn-out carpet covering on a cat tower with sisal rope.
This is a 3-tier tower with (3) 4×4 posts (60”, 40”, 18”) for a total length of 118”.
Using 3/8” sisal, how do I calculate the total feet needed to complete my project?
Brennan McGranaghan
Just got a 8 week old kitten for my lady yesterday. She wanted to buy a cat tower, but seeing I am a carpenter I saw no reason in buying one. This will be by weekend project. Modified a little I’m sure to her liking.
AngiePanda
I’d like to start by saying my cats are assholes and anything I actually put effort into they generally avoid like most cats avoid the vacuum, mine aren’t scared of that noisy suck monster and sit around to watch me vacuum to make sure I don’t steal anything of theirs with it…weirdos right? All 6 of them, yes! We’re in the same boat though, my honey is allergic and a dog person… I already had 2 cats and then we compromised and got 3 kittens, his idea! LoL which turned into a baby happening despite my efforts to quarantine the little hussy. Anyway I am tempted to make one of these since it’s so simple and I already have everything but carpet scraps and I’m thinking I do have a couple throw rugs I wouldn’t mind cutting up that should be adequate… I’ve made my older 2 asscats beds that they loved till I actually took the time to sew everything together so out came the stitches and they went back to their beds…sigh* don’t know if I should bother but might make a great gift when mine refuse to go near it LoL
Larry
Been looking at cat post for quite some time now. Everytime I consider doing this I stop because I just couldn’t in my mind decide as to how to assemble a concept. Seen a lot of them but never really mentally built that me or took the time to plan one out. Thanks, yours looks simple and probably will construct one . Thanks for the incentive to do this. as far as the comments you received, you have handled them well, better than I would
Katie at Meadowia
Wow, this tutorial made building my own cat tower super simple – my furry friend absolutely loves it!