
Living in a town that is driven by travel and tourism, I notice two things are frequently happening around me—people taking photos, and people asking for directions to some place they will undoubtedly take more photos.
We’re in the theme parks all the time and I see many photo faux pas: shooting into the sun (hello, family silhouette), pictures at noon while the family has on hats (goodbye smiling faces), shots of the killer whale from row 134 of the stadium (what’s that black dot in the photo?), and the shot of grandma in the shade next to the kids are in the sunlight…oh, I’m sure there’s more.
But what I’m not sure of is why I’m the one who always get asked for directions. Am I the unthreatening-approachable-dad-type? Or maybe they know I’m local due to my lack of socks when wearing flip-flops.
Anyway, I get asked.
Oh, and I answer. My head quickly calculating the route I’d take to avoid traffic, stoplights, tolls…or perhaps I should respond with directions where I can remember all of the road names and exit numbers.
And then there’s the point-a-to-point-b-so-easy-to-understand-even-when-you-don’t-speak-the-language.
Yeah, that’s the one where I draw mickey years in the air as I point left and right.
Soooo…what does all this mean?
I’m gonna use one of the photo faux pas and show you that there’s at least three routes to travel in fixing it.
See how I segued there? Huh? Huh? Bringing it all together.

My kids doing crafts on the porch. You can see the sunlight casting in on the porch in the background, so my son is exposed properly (although he looks unhappy). But my daughter in the foreground is either super tan or was in the shade.
Adobe Photoshop Elements can handle this, and what’s cool is that there are at least three approaches to fixing this (and just about any) photo. They are simply editing modes based on your skill level in using the software.
Edit Modes
Quick Edit Mode: This offers beginning users a simple way to edit your photos using an intuitive interface while maximizing some really powerful features. In other words, can you point to a picture? Then you can edit all your cat photos like a boss.
Guided Edit Mode: As long as you can read, then this mode provides some easy-to-understand direction on using more advanced features as you edit your photos—an opportunity to learn and prepare for Expert Mode.
Expert Edit Mode: Calling all geniuses, or is it genii…well I don’t need to be one to use expert mode. It offers the full array of Adobe Photoshop Elements’ editing tools to adjust color problems, add effects and retouch your photos.
If you are impatient, like to read or just new to the software, stick with Quick or Guided Edit modes.
So I’m gonna tackle this using all three edit modes. Like a genius.
Fixing a Photo Exposure Problem

Using Quick Edit Mode, I have a number of options on the right side of the window that can fix my uneven exposure. For the sake of comparing apples to apples, I will edit the “levels” of the photo.

Clicking on Levels reveals some buttons that allow you to focus on the shadows, midtones or highlights in your photo. Since my daughter is dark, I will select shadows, then I simple choose one of the small photo icons to adjust. See the blue box around the small photo icon in the Levels palette? That represents my starting point of adjustment.

Here you can see that the shadows have lightened considerably, and I’ve selected the preset adjustment by clicking the third photo icon. I like where this is at, and got here with only a few clicks of the mouse. You could go on to adjust the midtones or highlights of a photo, making them darker or lighter. At this point I could save the photo and be happy.

But…not so fast. I want to see how Guided mode works. You can see once you click on the levels palette a very brief instructional appears. It describes how the level adjustments work in an easy to understand manner. Click “done” and you get to try out the levels palette…

The first thing that happens is Adobe Photoshop Elements creates a new layer. It’s what they call an adjustment layer, so you can make the adjustments to the photo that you want, but if you change your mind you can come back to the layer and edit again later. Here you can name the layer.

Now the Level palette appears. The first thing you notice is that you get a little chart-looking thing. That’s a histogram genius. By adjusting the little arrows on the bottom of the histogram, you can lighten or darken different value ranges in the photo. The little triangle slider on the left is for shadows, the one in the middle for midtones and on the right, for highlights.

I slid the midtones slider to the left, essentially lightening all of the midtones in the photo. Her face is lighter and I have achieved pretty much the same result I did in quick edit mode. There are more options for adjusting using the levels palette but I can only skim the surface here.

Now back to the original shot to edit with Expert mode. In expert mode, I’m going to focus on just adjusting the levels of my daughter, and not the rest of the photo. And show off that I’m an expert. (naaahh.) To do this I need to select the area of the photo I’d like to adjust. I use the Lasso selection tool and traced the area around my daughter. The Lasso tool looks like a lasso. Genius. See the little white and black line around her? Well that’s the selected area, and on screen it looks like marching ants walking around her.

Now, I will create an adjustment layer, just like editing in Guided mode did for me. But I’m doing it myself because I’m an expert genius. Go to Layer > New Adjustment Layer > Levels…

Name your adjustment layer…
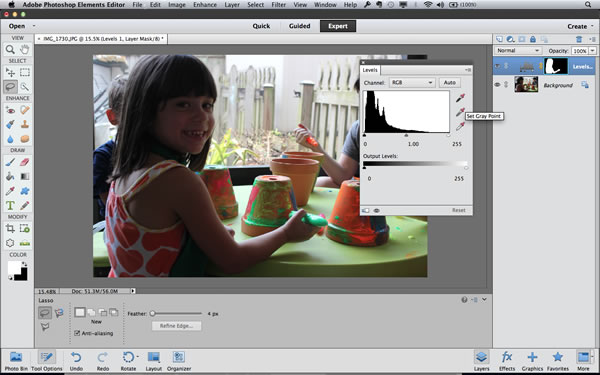
And now the levels palette appears. You’ll notice on the right side of the screen I have the layers palette shown. You can see the adjustment layer highlighted in blue, but you’ll also notice there is a little black and white icon—that’s a layer mask. The layer mask was created automagically since I had a selection active when I made the adjustment layer. This means any adjustment I make will only affect the selected area (the white area in the little icon).

So now I make my level adjustments and my daughter is looking better. And because I used the adjustment layer/layer mask, my adjustments do not affect the rest of the photo, where the exposure is okay.
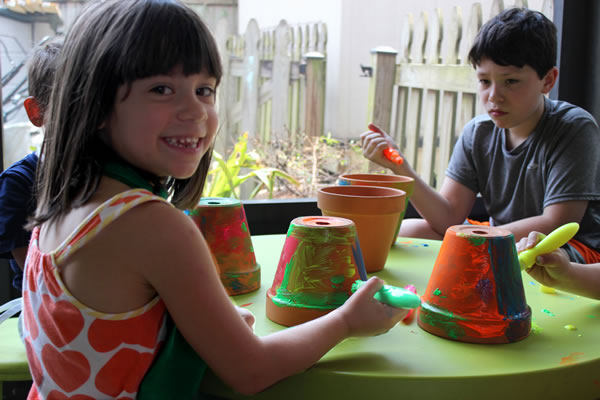
Here’s the finished shot. It looks better but could still use some work overall. But that’s for another time. You get the picture. lol.
And that’s three ways to solve your problem using Adobe Photoshop Elements. For many of you, just a few clicks and you’re off and running. For those genius know-it-all experts, you can see that the same power-packed features available to you in Photoshop are right here in a lighter, faster package. Now feel free to comment about the 8,000 other ways you would have approached this. ‘Cause you will. And you can visit the Adobe Photoshop Elements Facebook Page and share your work, find other tips or maybe tweet and let the awesome folks at Adobe know Dadand sent you—because we’re good at giving directions.


6 Comments
Robert
Regarding a series of photos that were taken using a fisheye lens. Is it possible to undo the fisheye effect using Photoshop, or Adobe Elements? To be clear, this fisheye effect was not added by using Adobe, the fisheye effect is the result of using a fisheye lens while taking the original photo. My question is….is it possible to “reverse” this effect after the fact using Adobe?
Marty
Robert,
That sounds challenging, but I suppose anything is possible. I’d approach something like that by transforming in warp mode. This could easily reverse the effects of a fish eye lens or effect. The challenges would be how severe the fisheye effect is and your end use of the photo—meaning you would be enlarging areas of your photo. You can always reduce the size of your images but not really enlarge as you cannot “create” pixels. It is resolution dependent, if you enlarge the resolution decreases. If you are starting with a really large image and ultimately reducing the size after you correct for the fisheye, then you should be just fine to reproduce the image. That said, I know you can accomplish this is in Photoshop using the transform tool in warp mode. Warp mode allows transformation of different areas of your image by sectioning off the image into a grid. I’m not aware that Adobe Photoshop Elements can transform in warp mode but I will check for you, ask Adobe and follow up here.
There also might be some third-party plugins that could help you achieve this.
A good place to start is at Adobe by reviewing the Transform tool in warp mode. Then You could search “Reverse fish eye effect” or “defisheye” and find some good tutorials.
I hope this helps, thanks for checking out Dadand!
Robert
Thank you for your interest in my dilemma and your solution comments. We had a professional photographer at a recent wedding and 150 – 200 of the reception pictures were taken using a fisheye lens. Five or six of them are very nice. However, the effect gets very old, very fast. It is boring to look at the same curved ceiling, curved columns and “big-nosed” closer dancers over and over again. The photographer says…that’s the way it is…they can change the sharpness, change the shading and tonality, even change the color, but they can’t reverse the fisheye effect. (and they do have the raw files). We thought it was great that they were taking so many pictures, but had no idea that they were using a fisheye lens for nearly every picture.
Charlie Croucher
You left out one of the easiest way of lighting up those shadows-Enhance > Adjust Lighting > Shadows/Highlights. This technique has been a long time and still works pretty good.
As to Roberts question he should try Filter > Correct Camera Distortion > Remove Distortion (the first adjustment at the top). I demonstrate this problem in my class and it works quite well.
Pete Fazio
Just doing what we’re told, Charlie. But a great tip.