I wrestled with the title of this post. It could also be called…
“Faking a Short Depth of Field in your photos”
or
“Photographing your child—making them stand out.”
After you read this, you might want to call it “brilliant”, “easy” or “The Best Post You’ll Read all Summer.”
Or perhaps something nsfw. Please leave it in the comments.
I might just approve it.
Okay, so during the course of the past two years in working on this blog, we’ve often featured step-by-step diy posts.
Do this…do that…blah blah.
You get it.
We’ve also tried to show some photos of what we did. ‘Cause it adds to the whole experience. Plus, how do you know what the fetzer valve actually looks like?
Well, in those photos, I’ve tried to highlight what we’re yapping about in a number of ways:
- By cropping the photo to eliminate most of the unnecessary background
- by taking the photo really close up to the subject matter (which often doesn’t work well if you don’t have a macro lens)
- by using some arrows to literally point to the content we’re referencing
And they all have kinda worked. But the other day I had an idea that I borrowed from dadand’s second job—advertising.
In advertising, we’d often blur out the background of photography, to some varying degree, to allow the subject matter to come to the foreground.
So to sell you a home, a car or a burger, we’d subconsciously make everything else in the shot just a little less appealing.
Trickery and tomfoolery you say?
Yup. And here’s how you can do it, to start making your own photos look awesome.

I started with a photo from the first time my kids saw snow. My son doesn’t like to smile a lot in photos, but I can assure you he had fun with that snowball. Oh, and I’m using Adobe Photoshop Elements Editor to manipulate this shot.
Photoshop Elements offers all the editing power you need, and provides a few interfaces for you to edit based on your experience with this type of software—I’m using the “Expert” mode although you don’t have to be an expert (see center top of window…”Quick”, “Guided” and “Expert”; more on these in another post).
In this tutorial, we’ll be using layers, a “blur” filter and the eraser. That’s it.
A Photoshop Elements document can have many layers, and for those of you that don’t know what a layer is, think of it this way: Place a sheet of tracing paper over a picture (a real printed picture). On that tracing paper, you can draw, paint, and erase without disturbing the picture underneath, right? Layers are similar; they allow you to draw, paint and erase over another layer without affecting it.
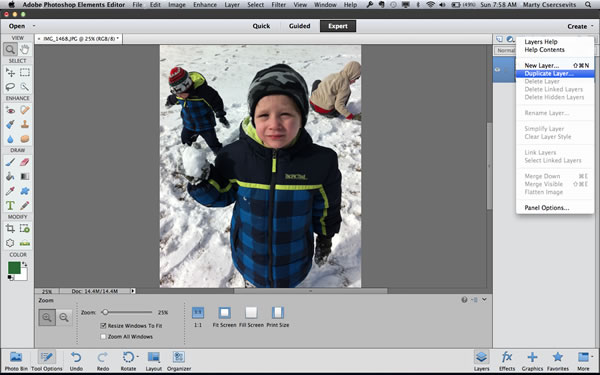
Step 1: Duplicate the Layer

I make sure I have the “Layers” button selected (bottom arrow), then click on the layers menu. (arrow at top right).

Give the layer you created a name. I called mine “Background Blur” so I can easily discern each layer I will be working in.
Step 2: Apply a Blur Filter

With the “background Blur” layer selected (see…it’s highlighted in blue in layers palette), I apply a blur filter to the whole layer. Go to the “Filter” menu, then select “Blur”, then “Gaussian Blur”.

The Gaussian blur filter can be applied in varying intensity. I chose to a blur radius of 10 pixels. Basically, the higher the number, the more blurry your image becomes. And the little preview window displays what the effect will look like. Click “OK.”

Now you can see the whole layer is pretty blurry. Enough that it looks like I took the photo without focusing the lens. But this is what we are after.
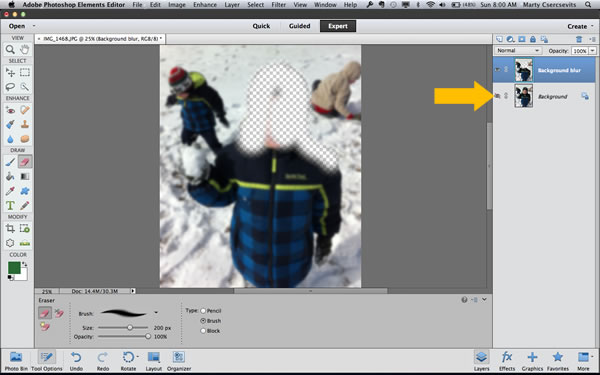
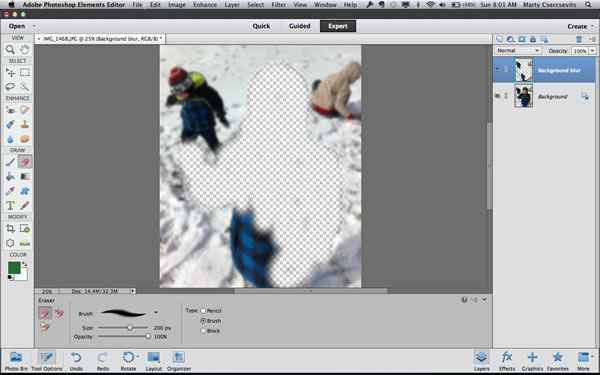
Step 3: Erase

This is where the magic is gonna happen. We need the eraser tool. It looks like an eraser. And if you hold your cursor over a tool long enough, Photoshop Elements provides you with a little tool tip, so you know what tool you are about to select.

When you select a tool, some options are displayed on the bottom of the window. I chose to have the eraser erase like a brush, then I set the size to 200px. You can see by the sample brush stroke that the edges of the eraser will be a “soft” edge, rather than a hard edge. You can select a few other types of brushes for the eraser to see what I mean…but you want a “soft” edge here.

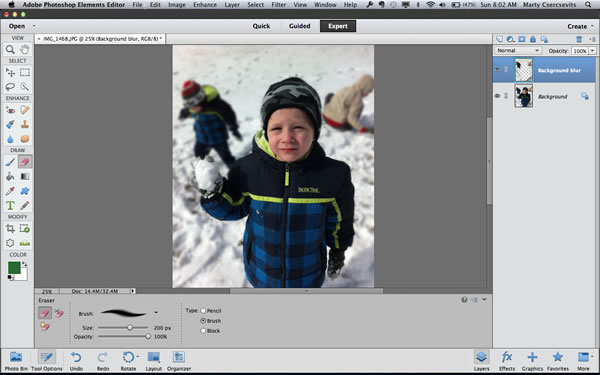
Here’s the final photo. You can see how my son is nice and crisp, while the “background” content recedes due to being blurry. Photographers have been doing this for ages by adjusting focal length to play with depth of field, which can result in background elements being out of focus. But how would you do that with a point-and-shoot or your smart phone?
Okay. That’s it. Easy…right?
Well, I’m gonna do it one more time, with less words and with a photo that I would use here on the blog…three easy steps…
Step 1: Duplicate the Layer

I want to showcase the transformer plug and the switch from the review of the BenchTop Pro…
Step 2: Blur
Step 3: Erase

Here’s the finished shot. By dropping the background “out of focus,” I’m able to highlight the elements in the photo better to reinforce my post…thanks to Photoshop Elements.
So there’s three steps to making your kid look better than all the others in the kindergarten play, to drop out the photo-bomber at the beach or to create some subliminal advertising photography—the secret’s out.
Now if you are asking “Hey Pete and Marty, where can I get Photoshop Elements for my PC or mac?” We are answering with “Hey reader, here’s a link to Photoshop Elements, where you can download a trial or buy it for only $99, and then have some awesome editing power for your photos at a really great price. And yes it does work for cat photos. You’re welcome.”
Hit us up with questions, or pul-lease post your shots to our facebook page, the Photoshop Elements facebook page (and tell ‘em dadand sent you) or put some links in the comments below.
I can’t wait to see what you do.
Oh, and want to know more about that fetzer valve?


5 Comments
Rebecca Ziebarth
Very cool tip.. I tried it and it was easy to do! Even for someone who has never used Photoshop! Thanks
Marty
Rebecca, thanks for your comment and for trying it out!
Auriya
thanks for this. I was just putzing around with the focus of my little dinky P&S camera and if the subject wasn’t 100% still, and you were more or less than 30cm away from it, it wouldn’t give you this effect. But now I can fake it! you rock.
Pete Fazio
Thanks, Auriya. There are many ways to create this effect but this is one of the quickest. Spread the word.